
Earlier this week we reported on a feature of Mac OS X Mavericks that could, potentially, deplete your data allowance if left unchecked. Depending on what kind of internet connection you use, this new feature could be handy or a hindrance – but thankfully it can be tweaked. In fact, there are a few things in Apple’s latest OS that can be enabled or disabled for a better user experience. To save you the effort of fumbling around preference screens and menus, we’ve listed what those tweaks are and what they do, right here.
1) Configure automatic updates
As mentioned in the article earlier this week, Mavericks has automatic updating – just as featured in Mac OS Lion and Mac OS Mountain Lion. What’s the big deal then? Well, Mavericks updates silently in the background, and never shows any notifications after apps get updated.
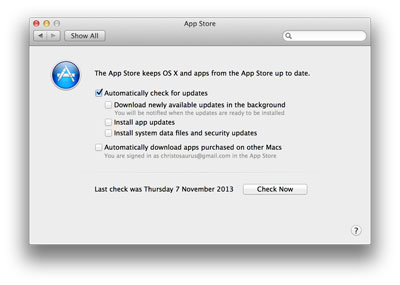
To prevent it from quietly chipping away at your monthly data allowance, simply open System Preferences and click on App Store. There you’ll be presented with options to disable auto updating, or to simply receive a notification when application updates are available. Select only the latter, and your bandwidth will be safe. Or leave them all checked, and enjoy silent updates on your uncapped line, without worrying about data usage.
2) Enable offline dictation
Mac OS X Mountain Lion had built-in voice dictation that allowed you to yammer away while the OS then transcribed the text. Except, that feature needed internet access to work properly – much like Apple requires Siri on iPhones to have internet access. Thankfully, OS X Mavericks supports an offline dictation mode.
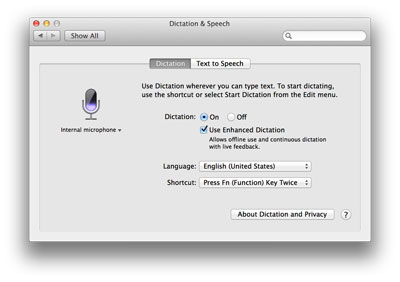
Once again, navigate to System Preferences, and then click on Dictation & Speech. There you’ll find an option to enable dictation – on, by default – as well as an option to use Enhanced Dictation. This is a feature that allows offline dictation – though it does require a 700MB file download beforehand. Enable this feature, and then activate voice dictation using the keyboard shortcut, to initiate the download process. One bonus of Enhanced Dictation: it will type as you speak, rather than amassing all the words and only typing them after you’ve stopped dictating.
3) Set up iCloud Keychain
If you use Apple’s Safari web browser you’ll definitely want to take advantage of iCloud Keychain. This Apple-only tool will save your browser passwords as well as credit cards, and sync the information across your Apple devices. So if you have a second Mac, an iPhone, or an iPad, you never need to bother memorising all those website passwords.
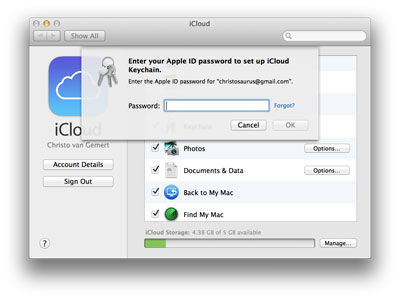
The iCloud Keychain wizard can be started by enabling iCloud Keychain. To do this, go to System Preferences, then click on iCloud. Check the box for Keychain, and it’ll prompt you for the necessary details. You’ll have to enable it separately on any other Apple devices you have
Just a note: iCloud Keychain only works with Apple’s own browser, Safari.
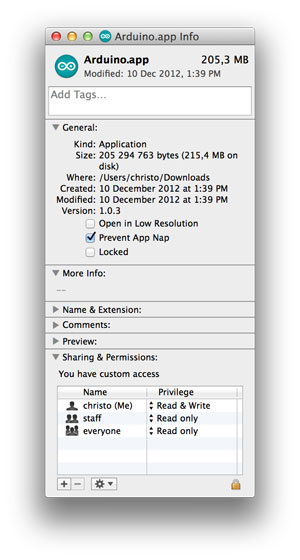
4) Configure App Nap
One of the great power-saving features in Mavericks is App Nap, a part of the operating system that will effectively put applications to sleep when they don’t have any open windows, or have no visible windows. But it can mess up certain applications that are required to run in the background. If some of your apps have been problematic since the upgrade to Mavericks, you can disable App Nap on a per-app basis.
Simply right-click on the application in question and select Get Info. In the properties panel that opens there will be an option to disable App Nap. Give it a go, and the app in question might stop crashing. At the very least, it’ll behave like it used to in previous versions of Mac OS X.