
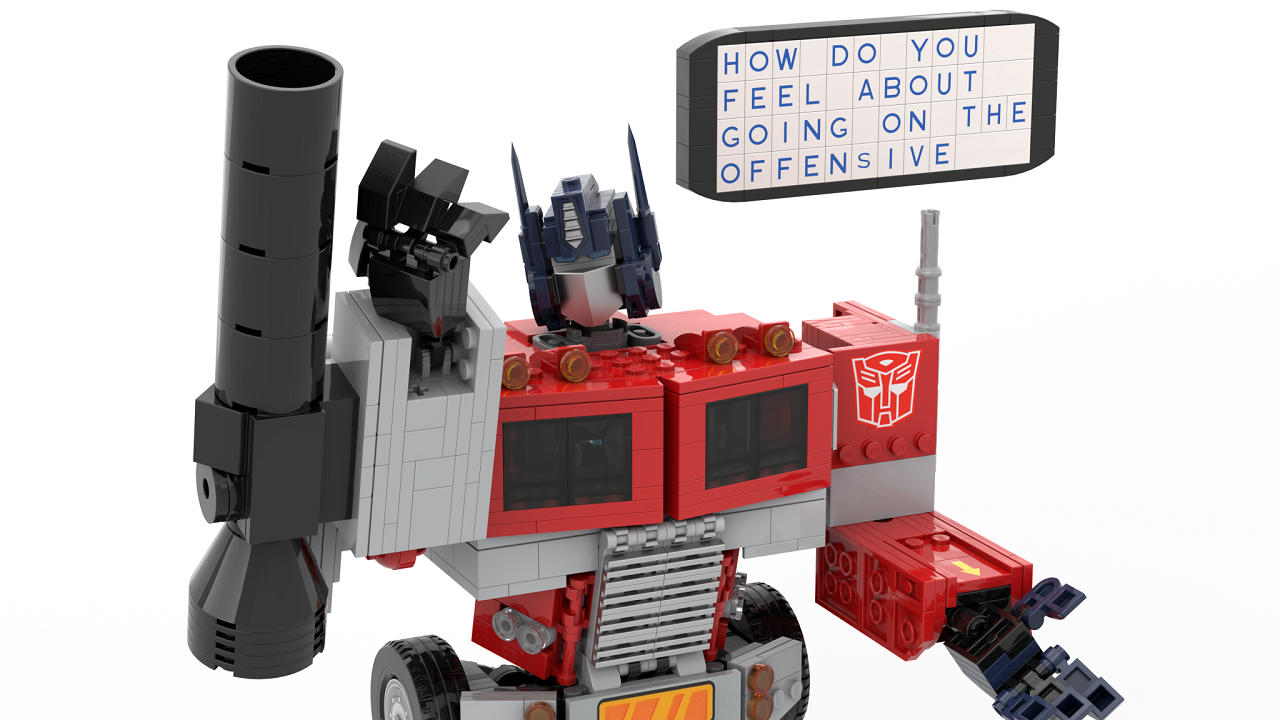
Transformers returned to comics a few months ago in a new run from Skybound and Image Comics, and it has generally been well received by the fandom. The most recent issue at the time of writing, issue #4 released in January, features an almost instantly classic page with Optimus Prime replacing his missing arm with that of Megatron, complete with the iconic Fusion Cannon.
While I would usually classify this as a spoiler, no matter how much it has been shared by the internet without a spoiler tag, Skybound / Image itself has been using it in promotion for the upcoming issue #5. Optimus Prime with the Fusion Cannon is actually the cover art of issue #5 and previews of issue #5 have been shared in a preview to further drive up hype for the new comic.
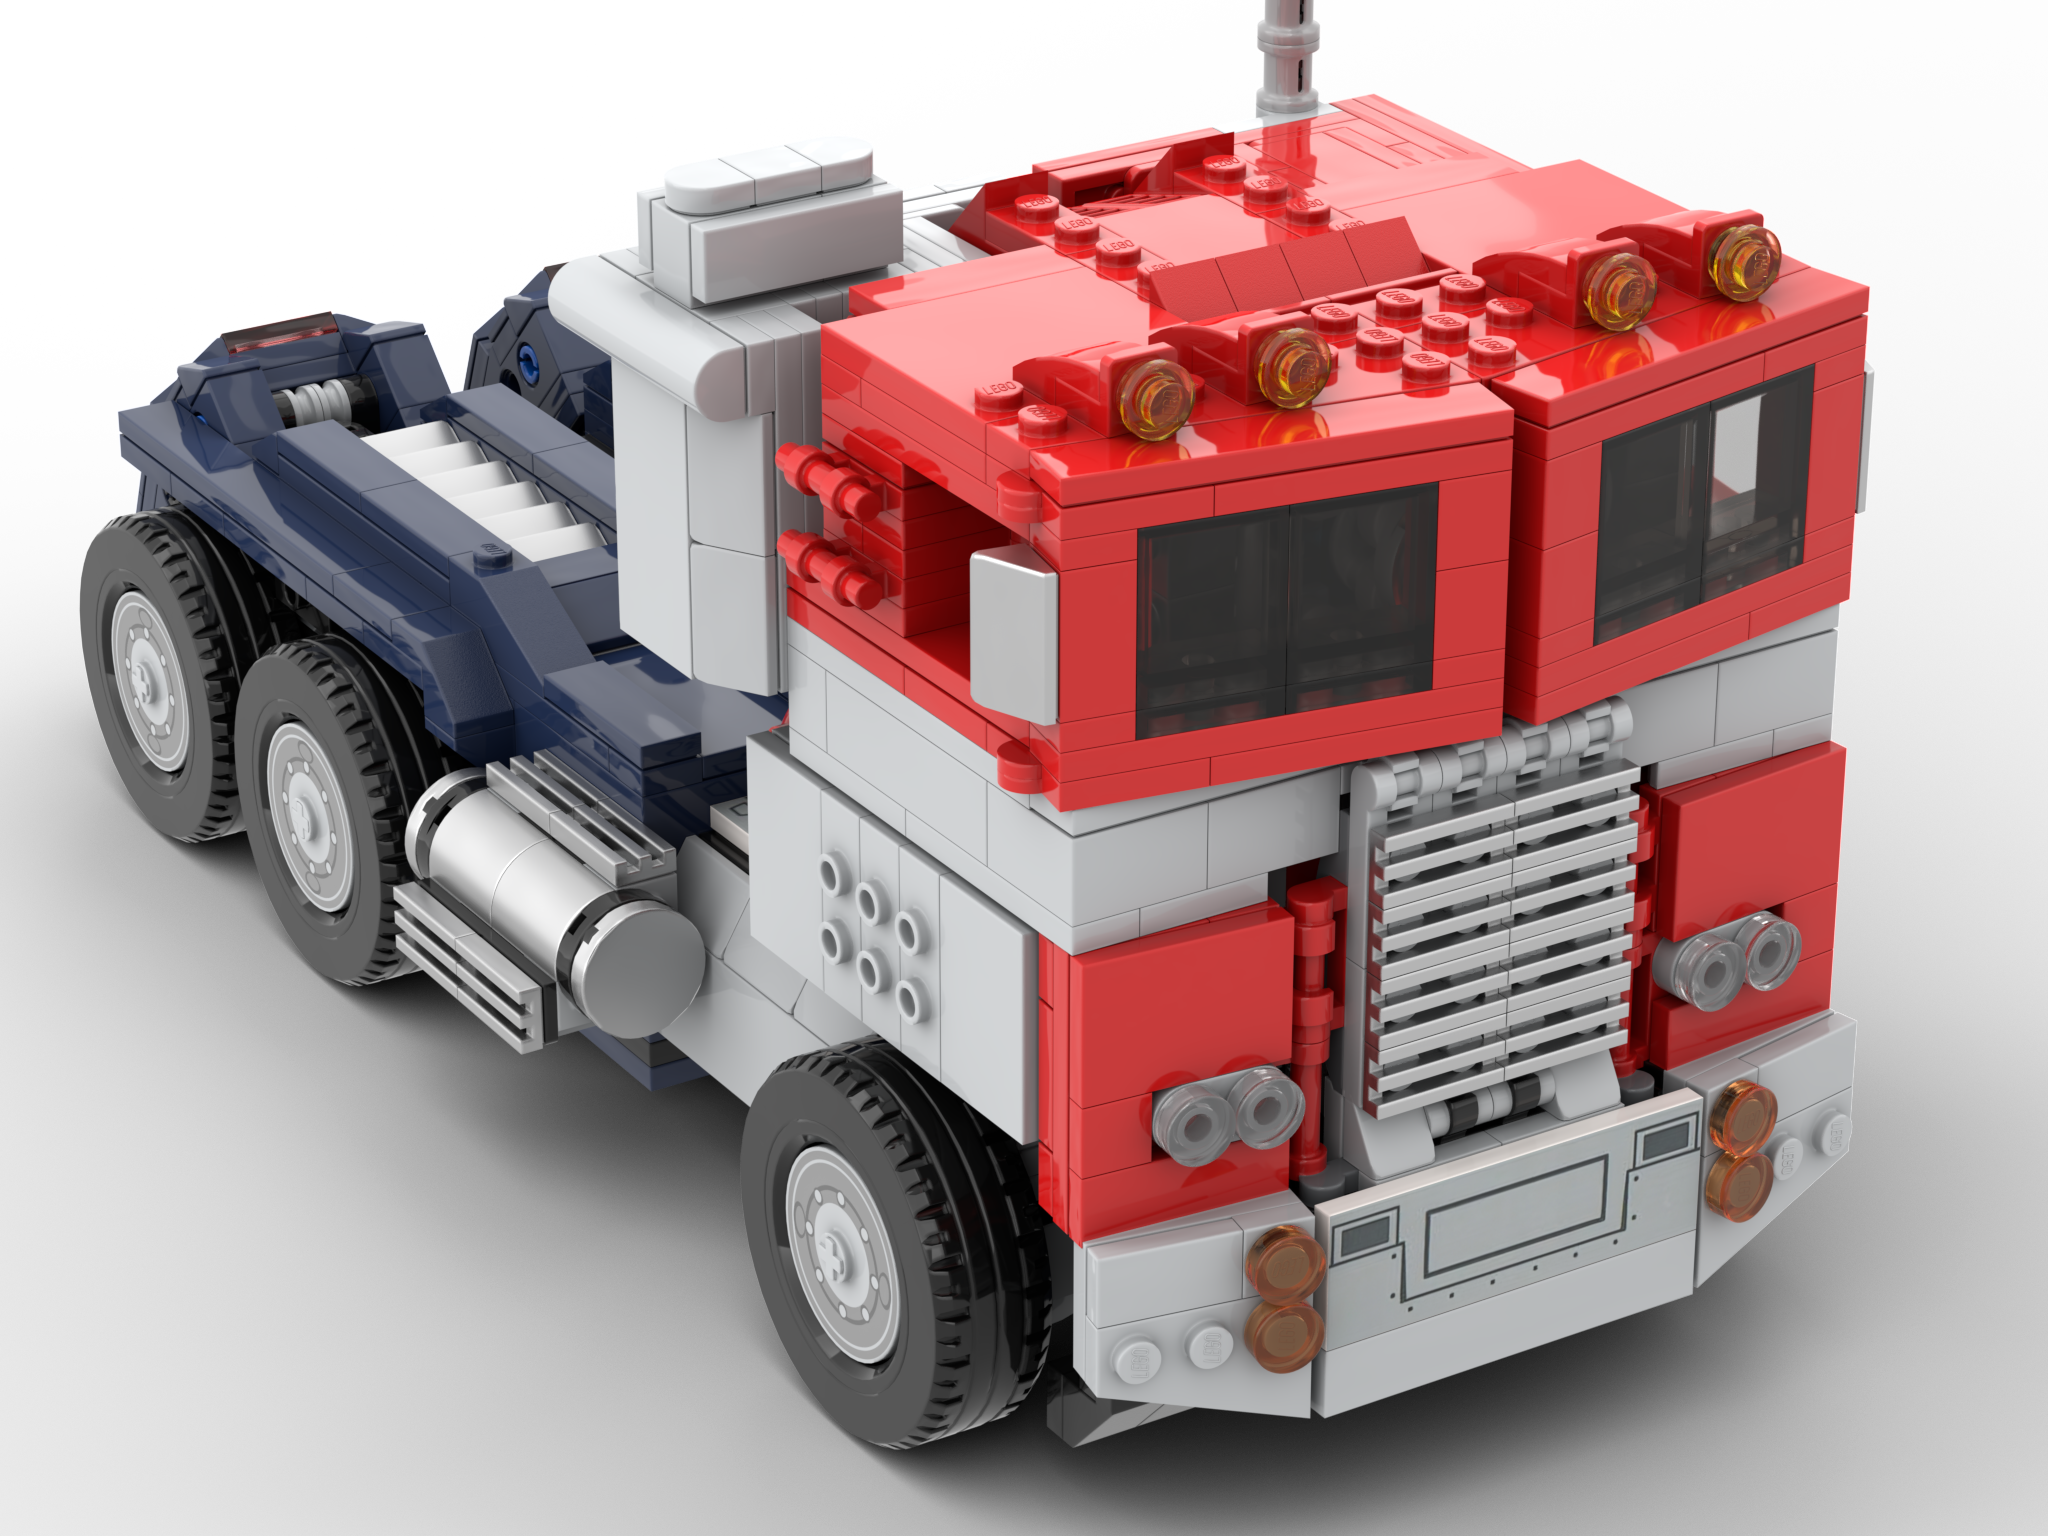
You can see all of this in the image below and you can see that the design of the Transformers themselves in these new comics is very much inspired by the G1, original aesthetics. This is handy for us LEGO builders as the official Optimus Prime LEGO set (10302) is also based on G1, so we can do some modification to copy what has happened in the comic.
With that in mind I got to designing with some key goals in mind:
- Make a Megatron arm for Optimus Prime that doesn’t interfere with transformation.
- Make a Fusion Cannon for said arm.
- Design the Fusion Cannon so it can be stowed away when Optimus Prime is transformed into a truck.
- Avoid expensive or difficult to find pieces.
- With all the above accomplished, create instructions so others can make do the same.
As you may have guessed by the fact that you’re reading this article, I was successful well mostly. Below find out more details about the project as well as free instructions so you can kit out your Optimus Prime with a new arm and more firepower.
Megatron arm
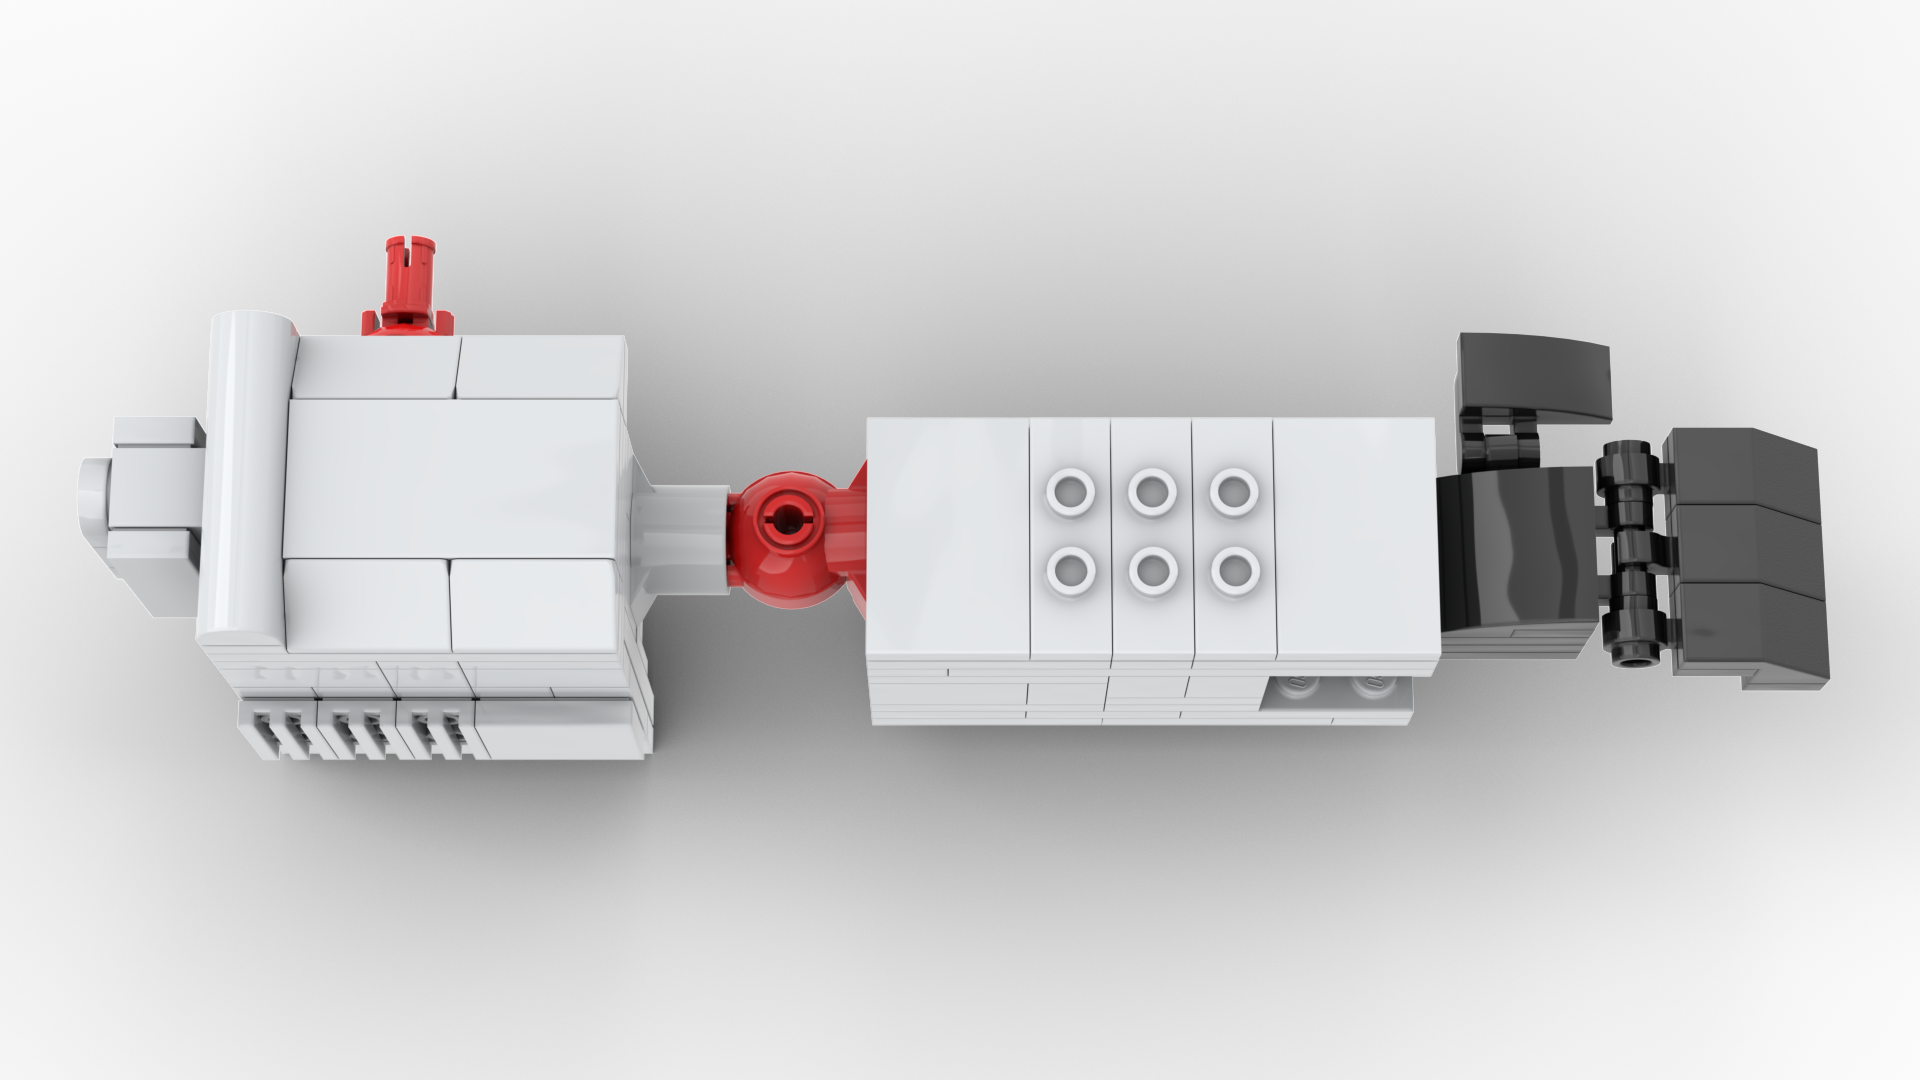
Originally the Megatron Arm build was going to be a simple colour swap of Optimus’ arm to completely avoid any issues with clearance or the transformation, but as the project went on I wanted to modify it more to look more accurate.
While I did most of the design work digitally, I did use physical pieces and my copy of the Optimus Prime set to check tolerances and I noticed that the arms don’t need to be so strict, so I had some freedom to modify. Aside from aesthetics I also wanted a better way to mount the Fusion Cannon as the original way I had – simply attaching to two free studs on the arm – didn’t work.
Before we go any further I just want to say that you can build the Fusion Cannon and use it with the original Optimus Prime without any further modification. Those two studs are fine for simple display but you will need to add an additional brick under the cannon for clearance.
This clearance issue on the forearm was the first thing I tackled in the arm build. I removed the parts of the arm which form the wheel arches (Megatron doesn’t transform into a truck, after all) and I removed the ladder detail for the same reason. I also slimmed down the forearm and made it more blocky, which looks more like a Megatron limb. None of this affects the transformation but it does make the truck look incongruent which is kind of the point.
This slimming down also allowed the Fusion Cannon to be more flush and look more accurate.
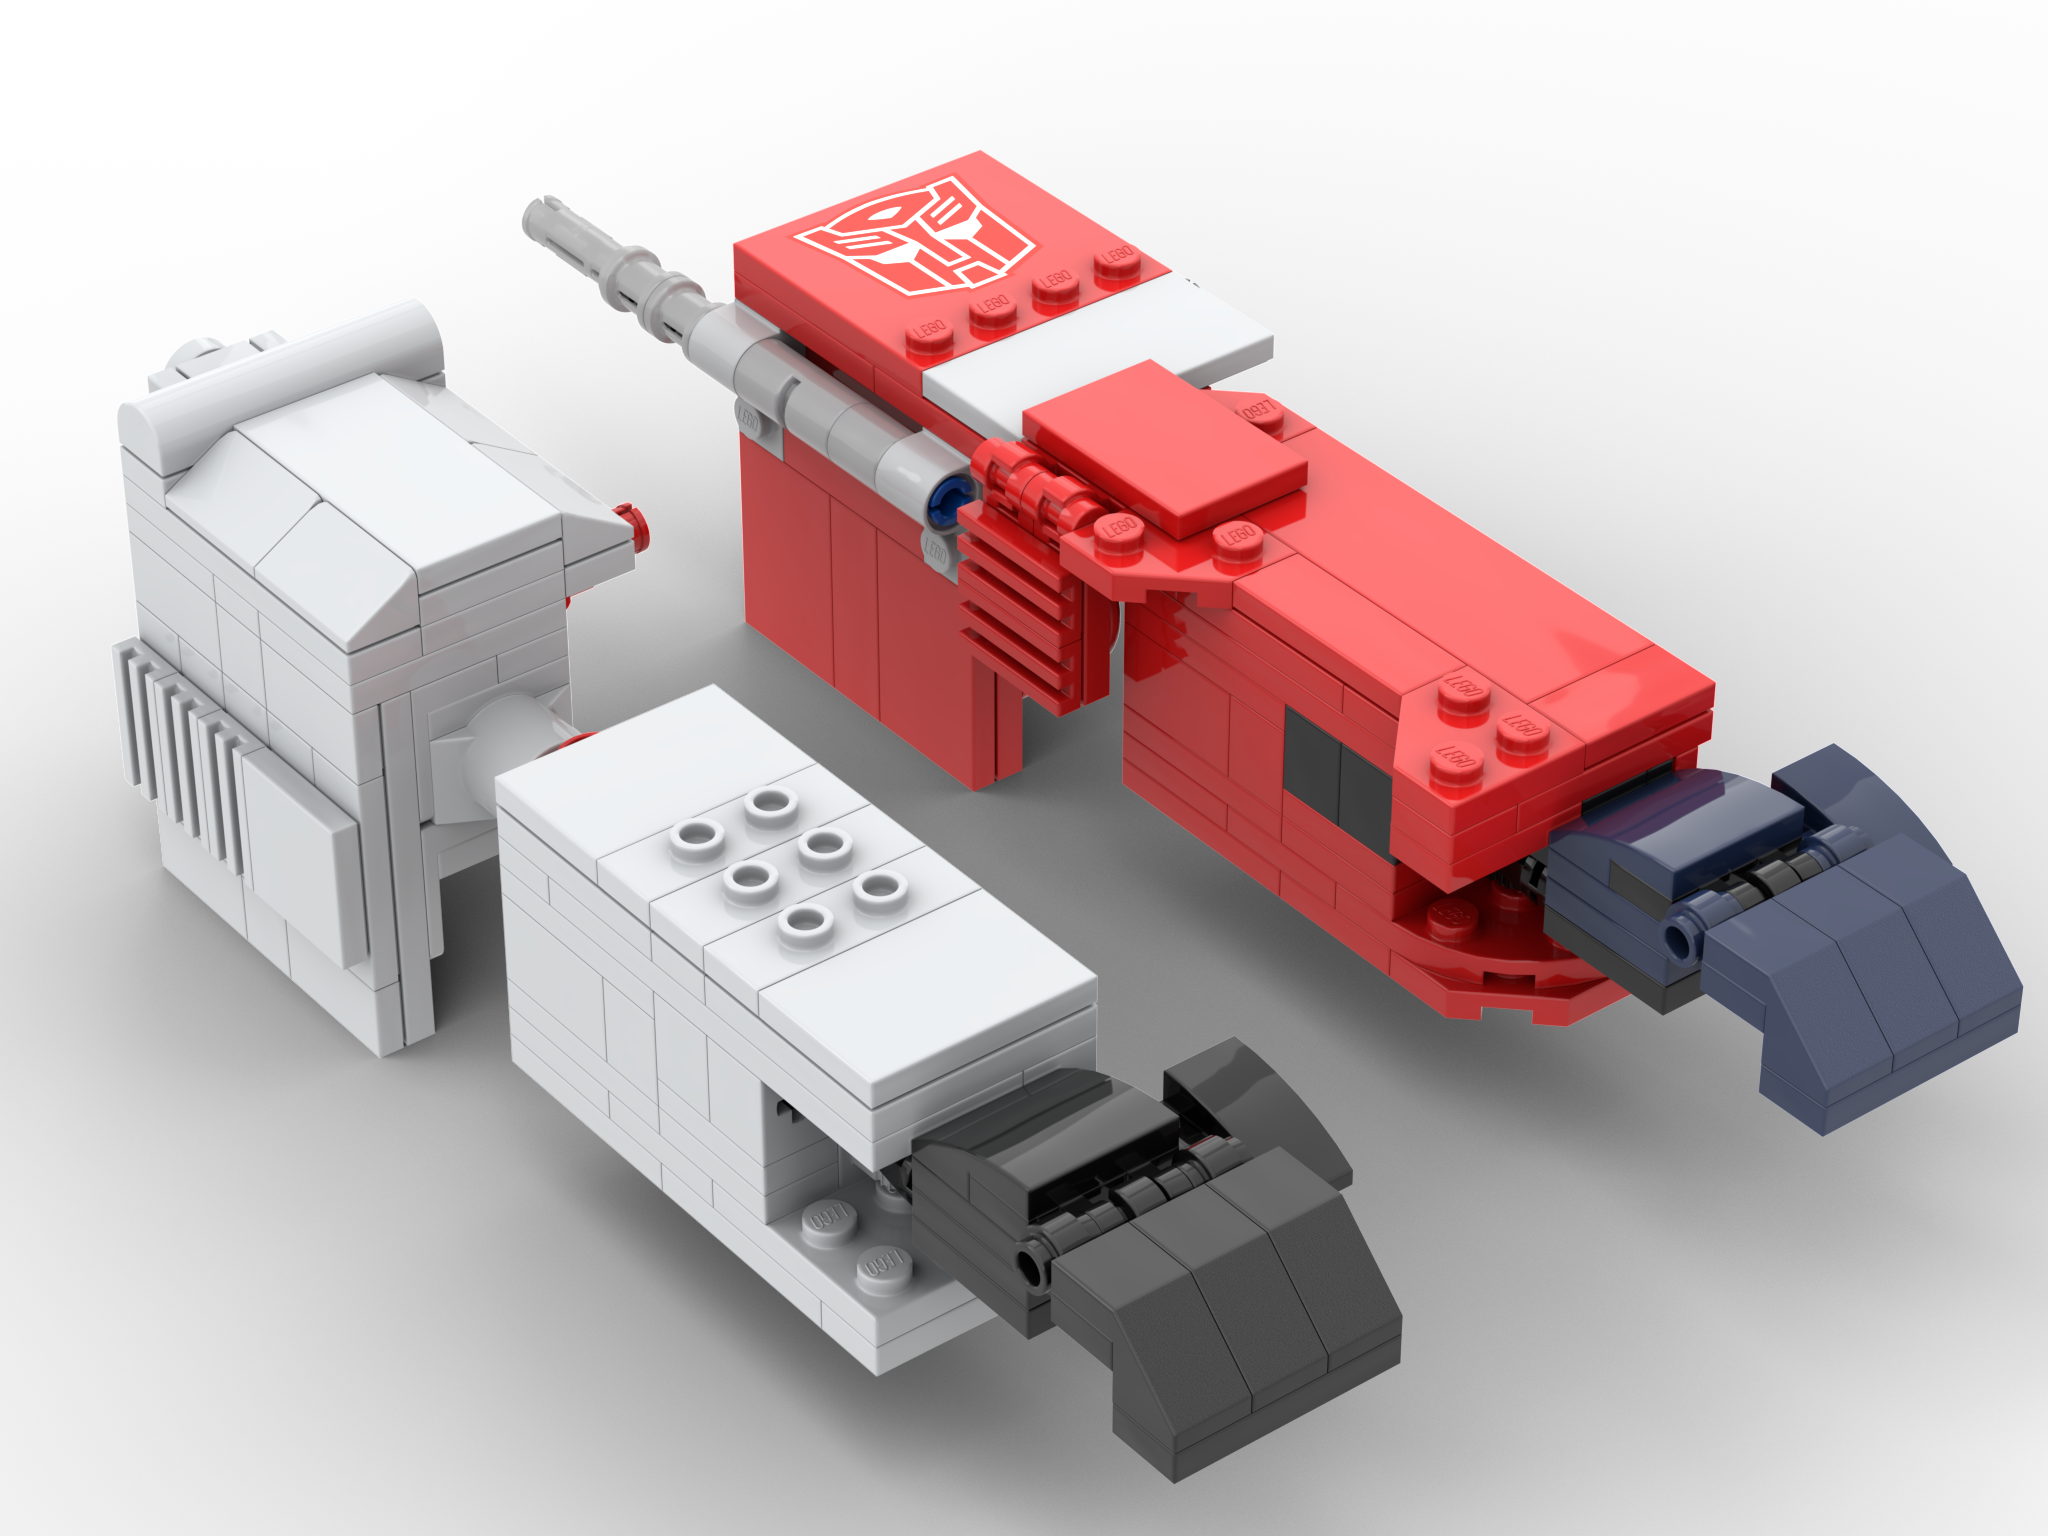


The next and easiest part of the arm was the hand, which is the Optimus hand recoloured into black. I have done this precise recolour before when I made my LEGO Nemesis Prime. Megatron toy portrayals almost always have the Fusion Cannon and hand as the same colour, and black was the way to go here instead of dark grey which is also sometimes used.
All that left was the upper arm which was a careful balancing act of making it look like Megatron without stripping away too much which would impact the alt mode. Taking away any mass here would make the truck look less like a truck and more like a folded up robot. While that was fine for the forearm, the upper arm forms the back section of the cab which hides Optimus’ head in this mode, and I didn’t want to ruin that even if the upper arm isn’t entirely accurate.
I did remove the smoke stack and made some smaller adjustments, like using red joints as you can see red joints in most G1 versions of Megatron. Strangely the red Optimus prime uses mostly grey joints so this was an easy swap.
To make your own go to Rebrickable and download the parts list (Megatron_Arm_Parts.xml) and the PDF instructions (Megatron_Arm_Instructions.pdf).
Fusion Cannon
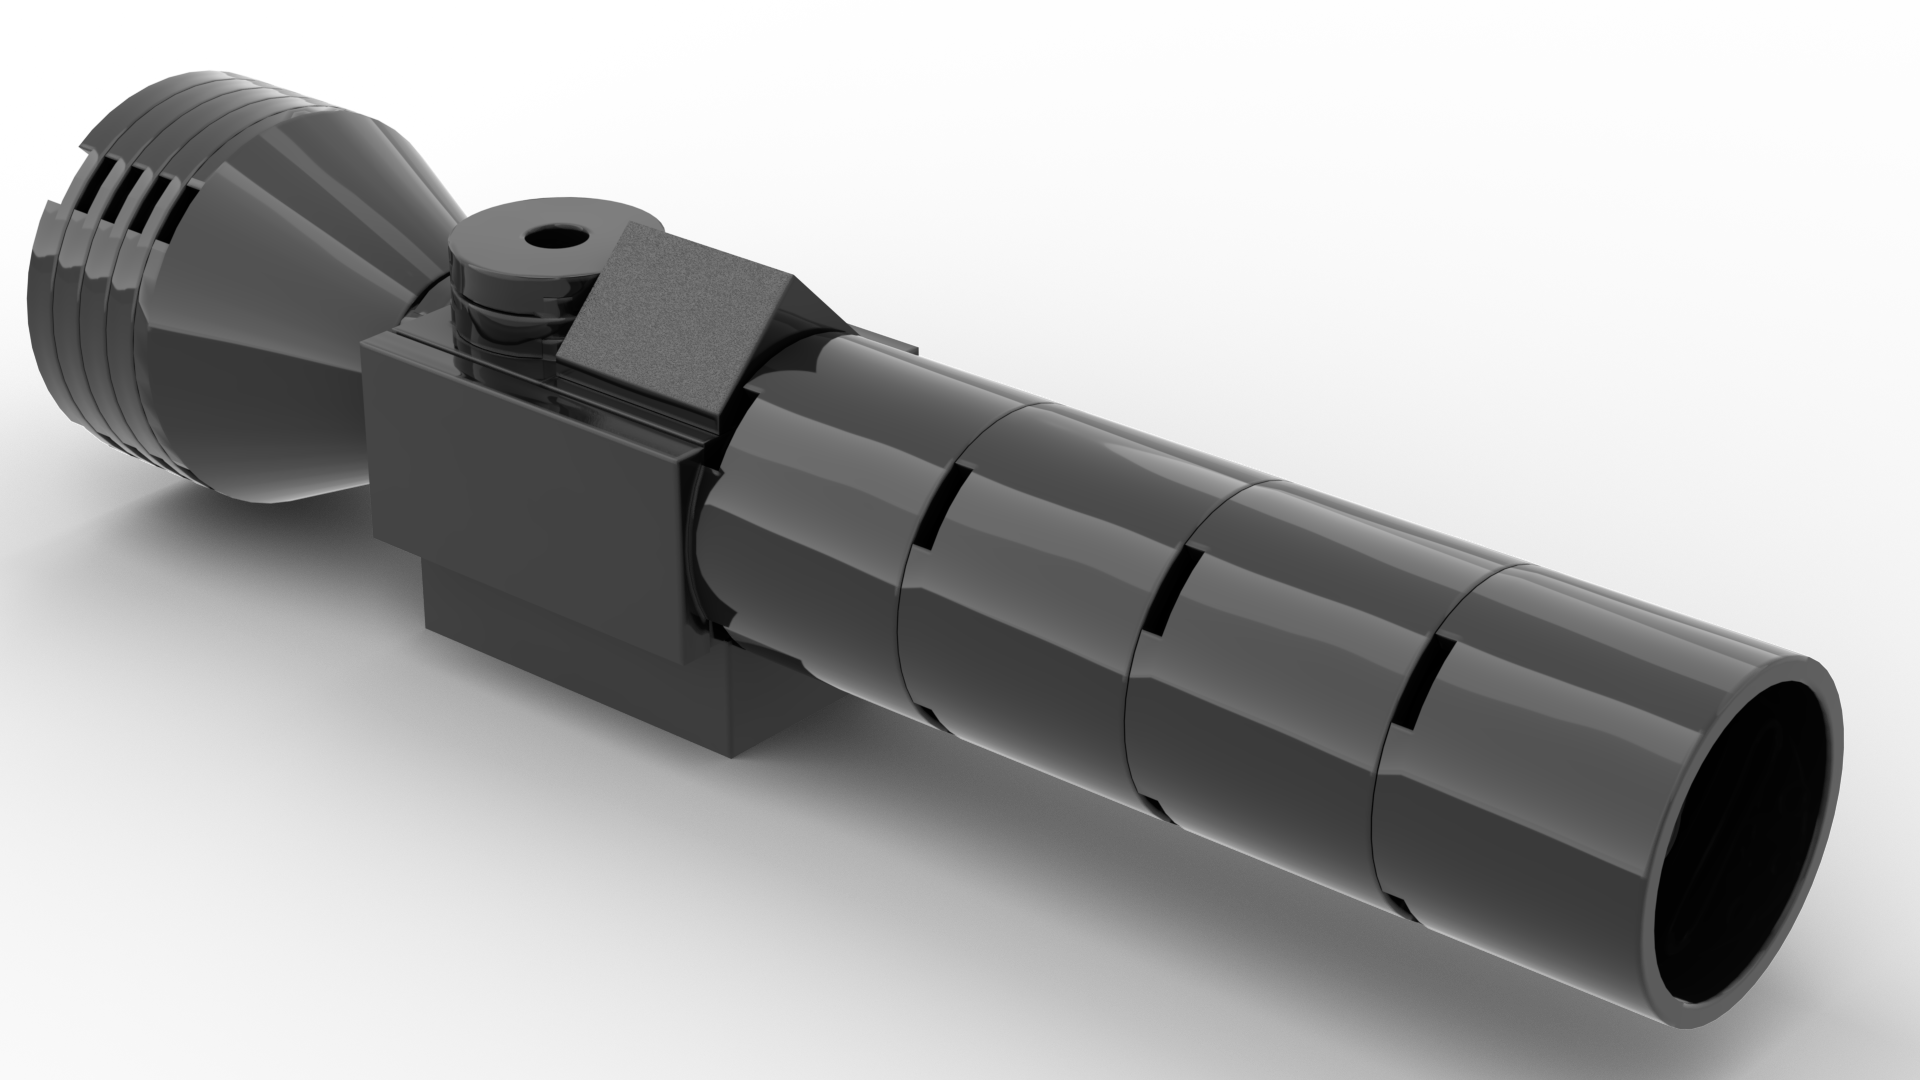
The Fusion Cannon has a simple silhouette that that betrays the intricacies of its design that make it difficult to replicate. There’s a lot of subtle detailing and curves which you only really appreciate after spending a long time looking at references images from Megatron designs over the years.
For this Fusion Cannon the scale was dictated by two elements – the round bricks making up the barrel and the cone piece on the back. Here I was a bit limited by the LEGO inventory as I wanted a slightly larger cone but anything big was way too big.
On the topic of that cone section I even hid in a bit of a surprise. For those who may not know the Fusion Cannon is just a gun scope. The original Megatron toy transformed into a gun and the cannon was a scope. In reference to this the back of the Fusion Cannon has some transparent clear elements to mimic the glass lenses you’d find in a real scope. When you attach the Fusion Cannon to the back of Optimus prime in truck mode, you can also pretend that this is some kind of rocket or thruster.
The middle of the Fusion Cannon is seemingly just a black box but, again, there’s a lot of subtly, like how it narrows towards the base. I spend some time coming up with some super complex ways to ahcieve this without making the overall build too bulky, but I settled on something simpler using brackets, tiles and ending in a good old 2X4 standard LEGO brick. There’s also some smaller detail which I think are supposed to represent an iron sight and an adjustment knob of a real gun sight, but I don’t know enough about firearms to confirm that.
The end of the cannon, the main body and the back cone section are all connected by one long LEGO axle running through them all. This adds a lot of rigidity this weapon and it allows for the barrel and cone sections to marry to the main black box seamlessly.
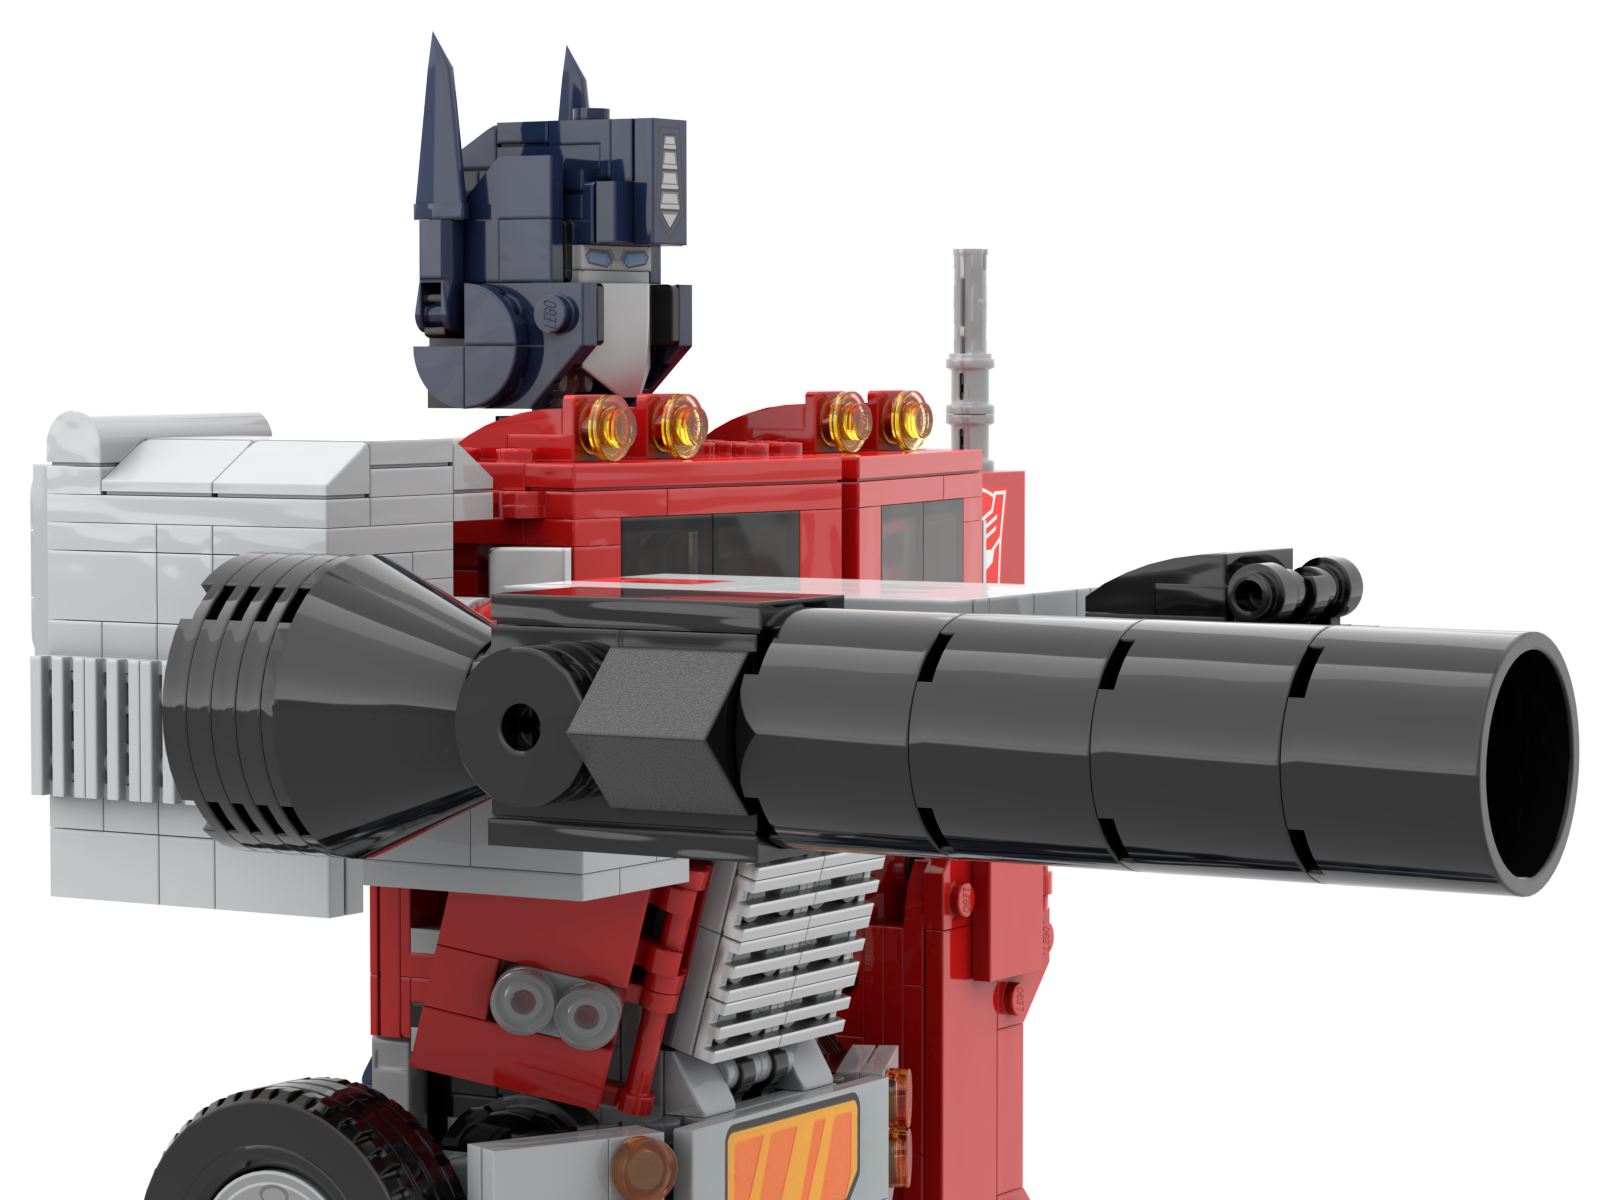


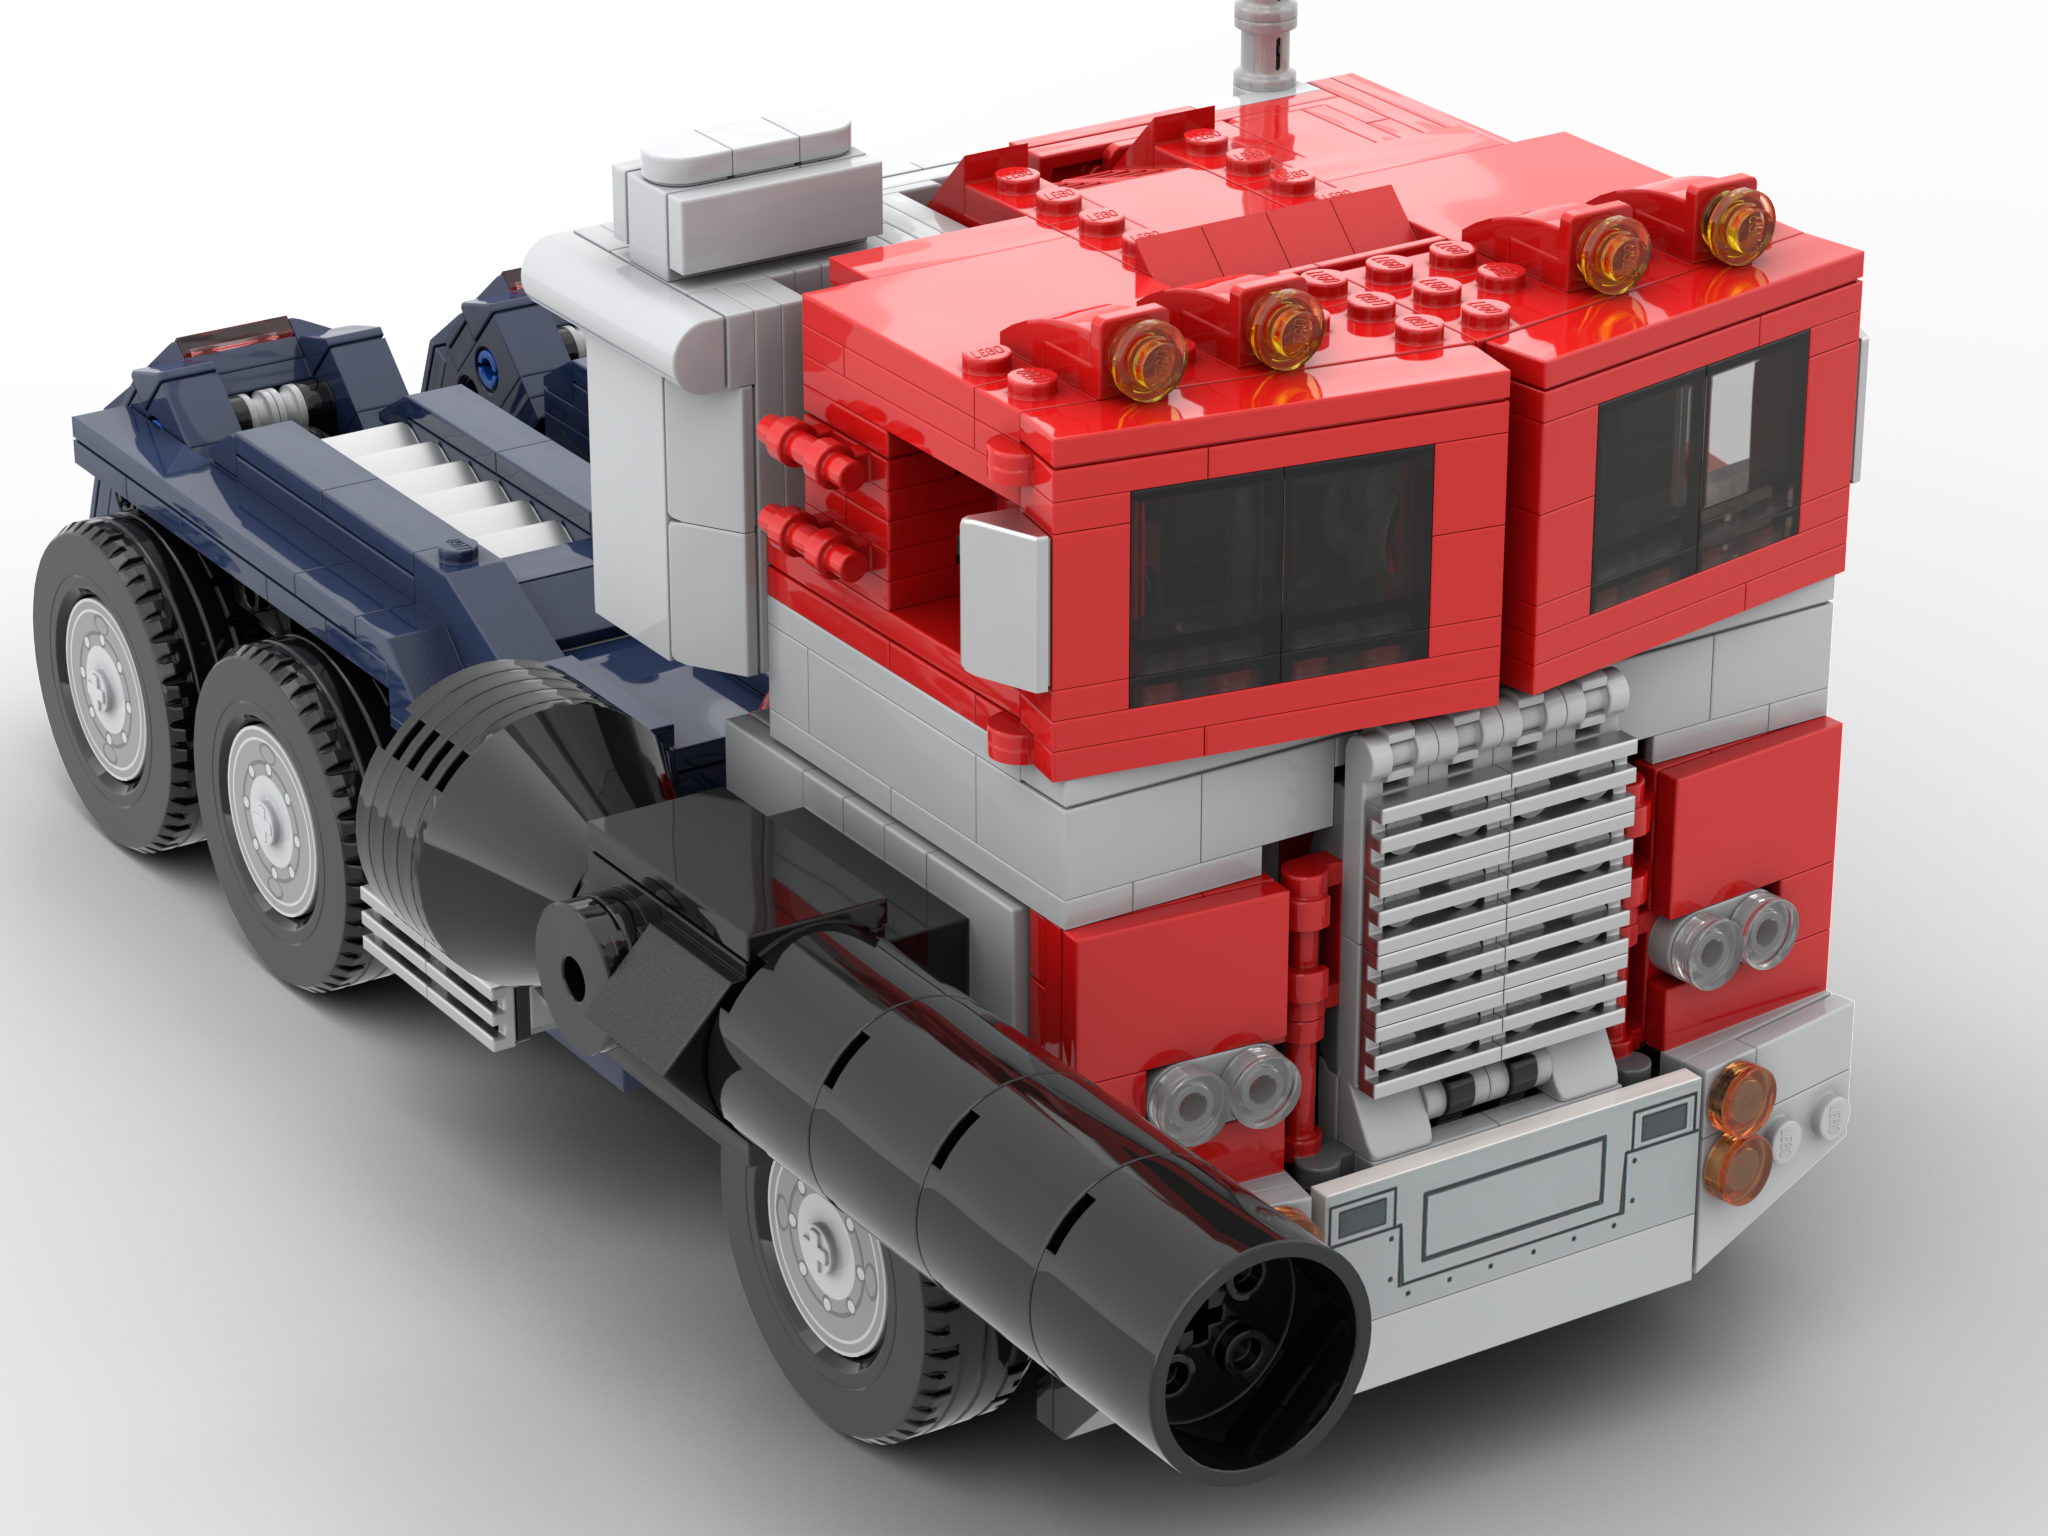
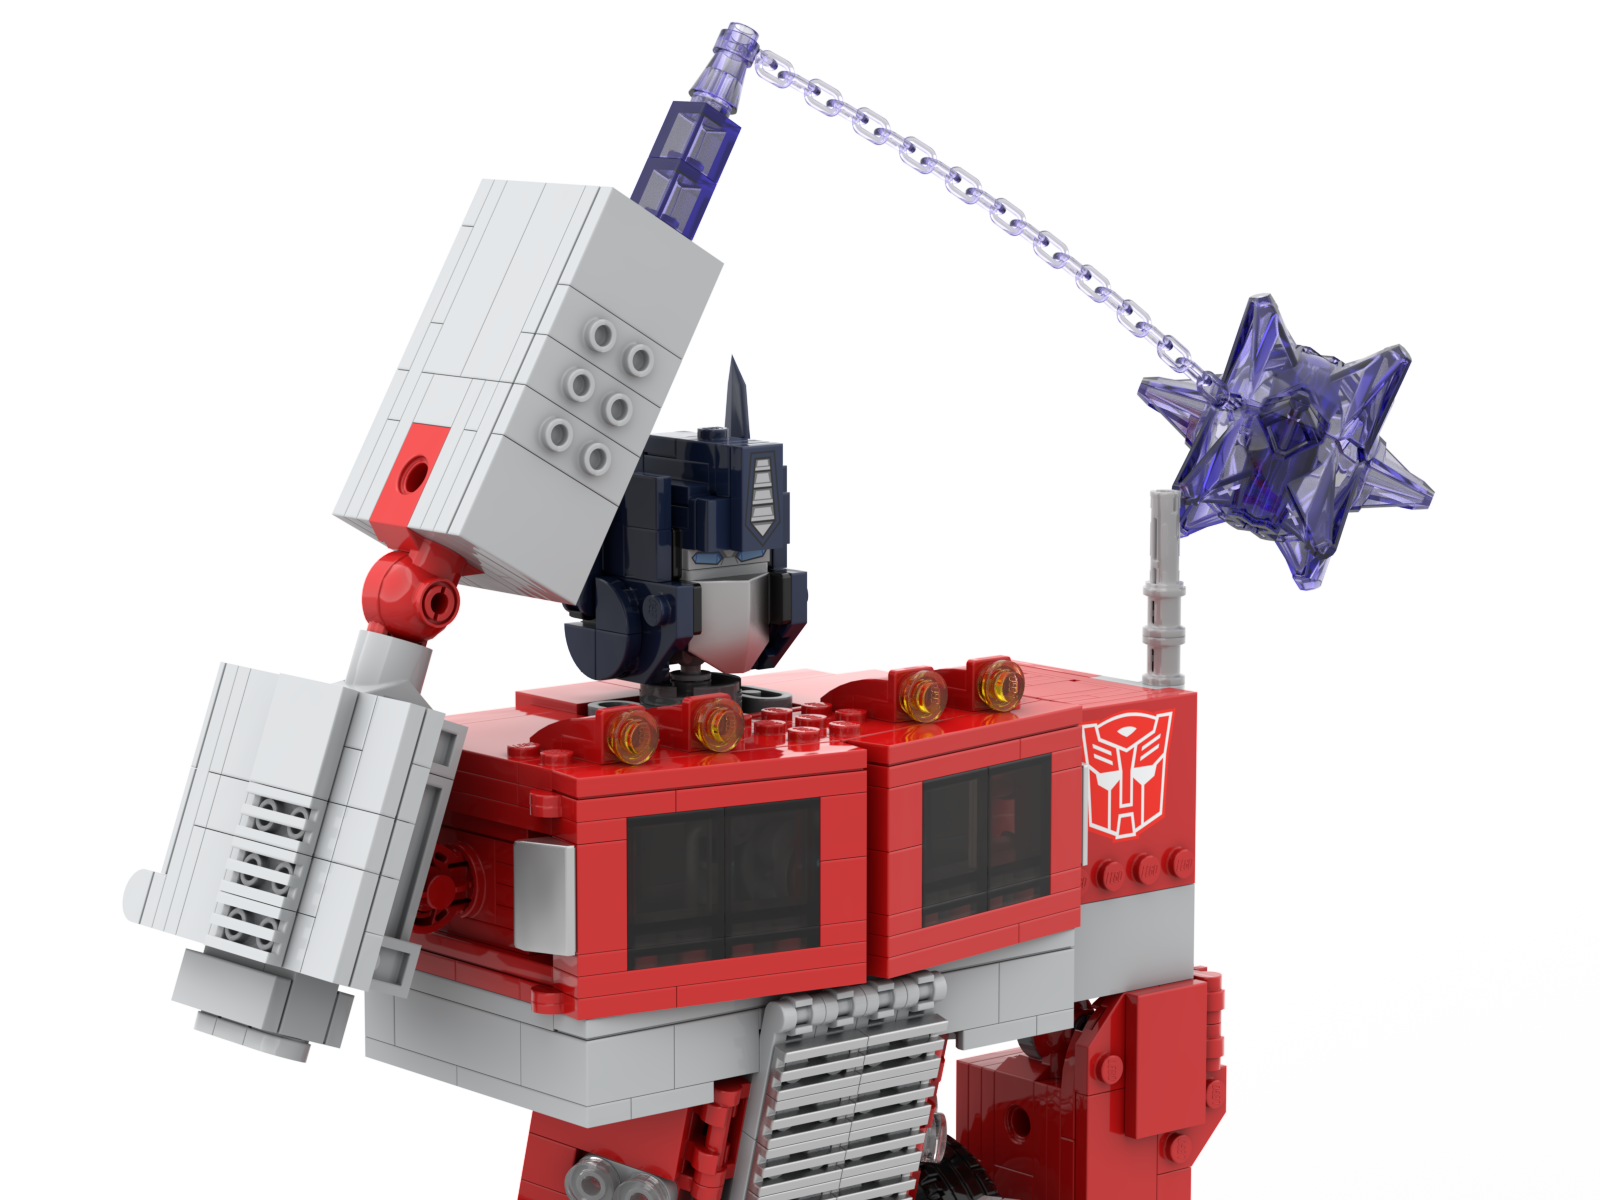
Now for storage. The Optimus’ Ion Blaster which comes in the LEGO set can be stored away nicely on the back of the truck, tucking in nicely between open gaps in the build. I wanted the Fusion Cannon to be the same but that didn’t happen. The cannon is too large to fit where the Ion Blaster does, but too small to directly attach to some of the open studs on the back of the truck.
To get around this I made the smallest portion of the Ion Cannon – the end of the back box where the weapon also attaches to the arm – the same width as the widest part of the Ion Blaster. This allows the Fusion Cannon to slot into some areas of the back of the truck, but my recommended area can be seen in the image gallery. It uses the joints of the feet to keep it locked in tightly with friction alone and, as mentioned, you can pretend it’s a big rocket on the back of Optimus’ truck. Hey if Rise of the Beasts can do it, so can I.
I should also mention two other mounting / storage options for alt mode. While it isn’t shown in the instructions from LEGO, the jetpack that comes with the stock set can be attached to the back of the truck. Not only that but the Ion Blaster can hide underneath that and now, with the Fusion Cannon, that can sit on top of the jetpack to make a sandwich of robot weapon goodness. I really like how this option looks as the inner part of the “scope” looks like another output of the jetpack. If you don’t like this you can also just stick the Fusion Cannon to the side of the cab.
One final note is the around the length of the Fusion Cannon. Some may want to make it longer to reflect the bombastic nature of Megatron and the overkill of his weapons. This is rather easy to do with builders only needing to buy more pieces for the two barrel elements and the round hollow plates for the scope. Just take not that the aforementioned axle won’t be able to properly support this, and it will affect the alt mode storage, as well as posing with the extra weight overcoming the friction used in the shoulder and elbow joints.
To make your own go to Rebrickable and download the parts list (Fusion_Cannon_Parts.xml) and the PDF instructions (Fusion_Cannon_Instructions.pdf).
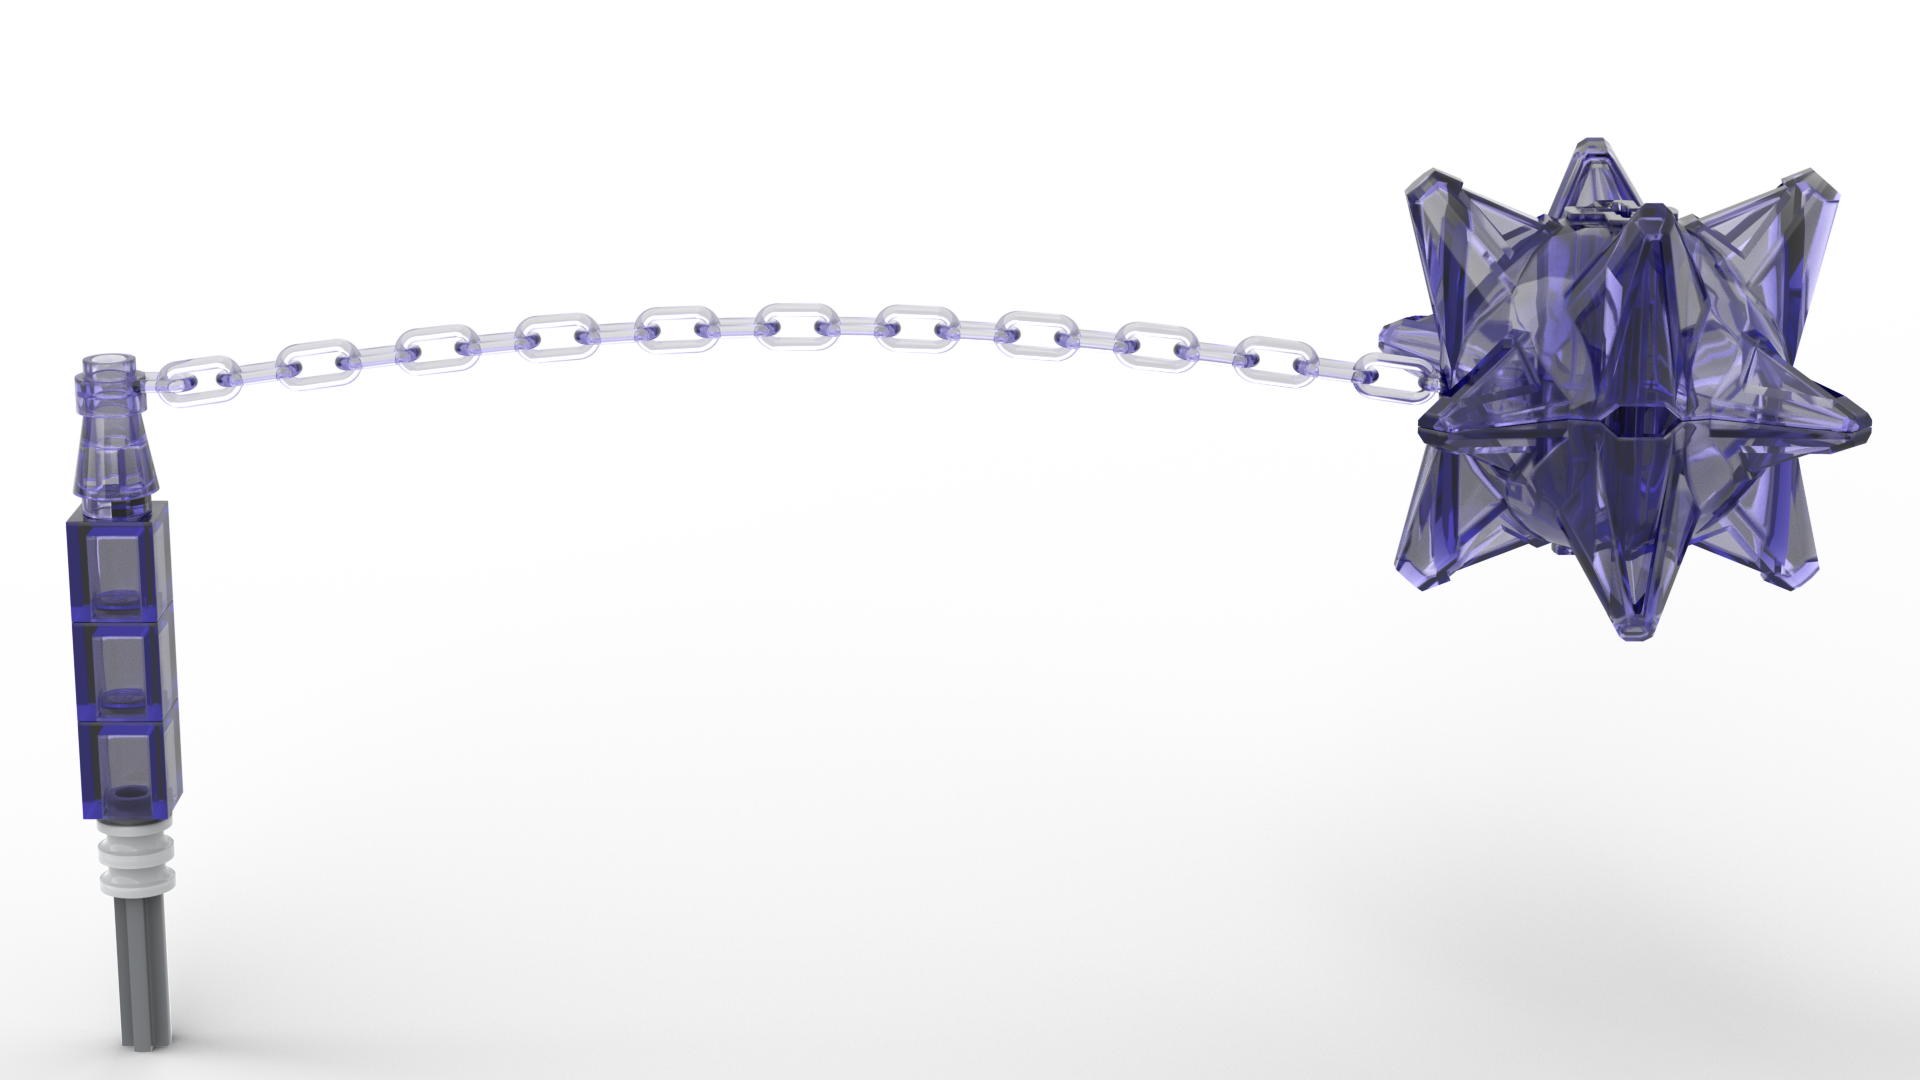
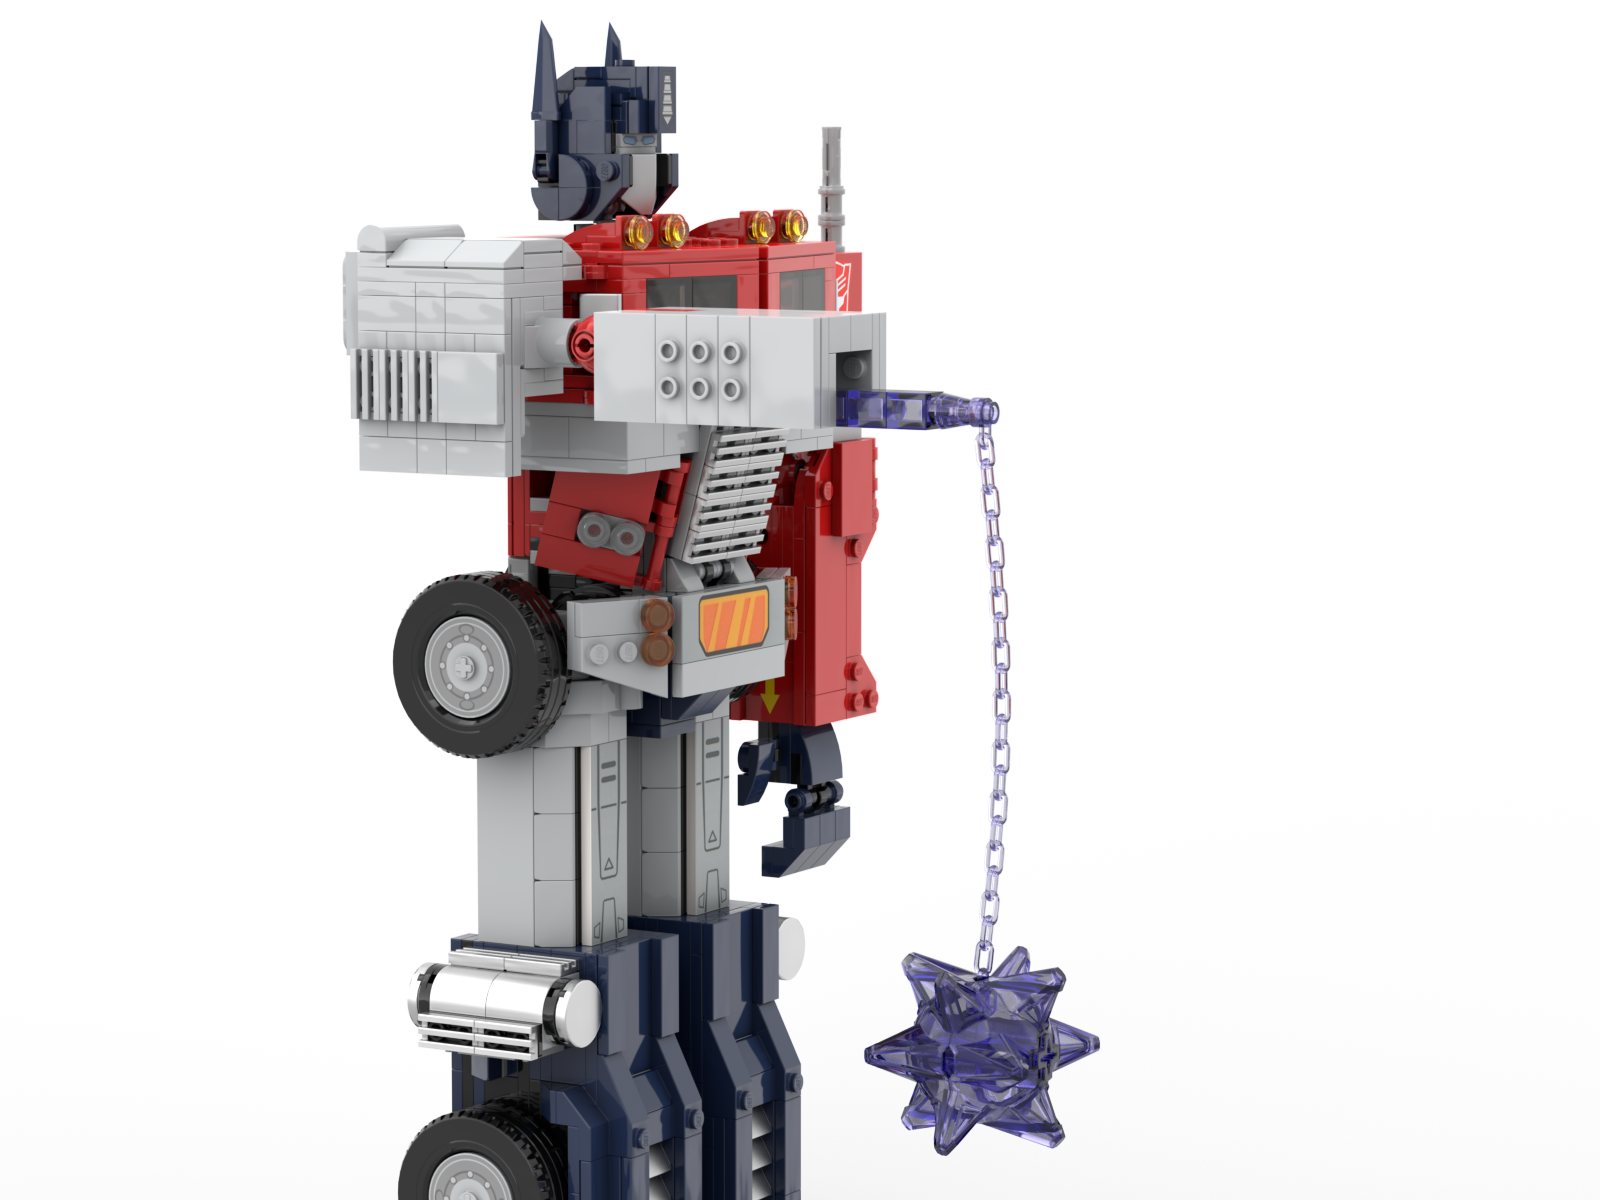
Bonus: Energon Mace
This is a last minute addition to the project that I came up with while still polishing the designs for the arm and Fusion Cannon.
The original Optimus Prime LEGO set comes with an Energon Axe as one of its accessories and both of the arms of the toy are designed for this with open axle holes near the wrists. Making an Energon Mace would work nicely as I made sure to retain these axle holes when I made the Megatron arm.
While I have now completed what I think is a great LEGO Energon Mace, it goes against my original plans to avoid expensive or rare pieces in its construction. This is because the two main pieces which form the mace and the chain connecting it to the arm all had to be in transparent purple to match how the weapon looked in the show and to mirror the transparent orange look of the Energon Axe. Transparent LEGO pieces are also the best substitute for glowing weapons, which is why LEGO has been using them for lightsabers and similar sci-fi weaponry for decades now.
The good news here is that LEGO does make the pieces we need in transparent purple, the problem is that they’re relatively obscure. The mace halves only came in two G2 Bionicle sets (71315 and 70781) while the chain was similar in just two sets: a Spider-Man set (7608) and an Elves set (41075). All four of these sets have been out of production for many years with the Elves one coming up on a decade as it was released in 2015.
Unfortunately, there’s no way around this as they are the perfect pieces for an Energon Mace and substitutions would greatly impact the overall look and finish.
Also, a challenge was the connection between the mace and the arm. You can watch the scene here and see that, not only does the connection flip from a solid colour to glowing every few seconds (almost certainly one of the countless animation errors in the original show) but it was an odd shape to capture in LEGO. My previous attempts kind of looked like a fishing rod jutting out of Megatron’s / Optimus’ arm.
I decided to go all the way with transparent pieces which greatly limited my piece choices as it’s a relatively rare colour. The rarity of the bricks is made up for by the fact that you don’t need many. The entire Energon Mace assembly is just 11 in pieces in total, and only seven of those pieces are the transparent purple.
A nice little feature here is that the chain isn’t actually attached to the mace head with any pieces. Instead the two halves of the ball simply form around the thinnest part of the chain’s end. The chain can’t slip out and it creates a nice and clean look where the chain is seemingly coming right out of the mace head because, well, it is.
This is all thanks to the fact that LEGO, for some reason, left small indents around the edges of the mace piece. I am not sure why they did this with my only guess being that it provides an opening to pry the two halves apart after they have been joined together. That would make some sense for a smooth dome but these mace pieces have lots of spikes that can be used to get a purchase on the pieces and separate them.
Finally, I am not sure why this is called an “Energon Mace” when this more resembles a flail. Hasbro has used “mace” to officially describe this weapon several times so it isn’t like this is a bad fan-given name.
To make your own go to Rebrickable and download the parts list (Energon_Mace_Parts.xml) and the PDF instructions (Energon_Mace_Instructions.pdf).

