

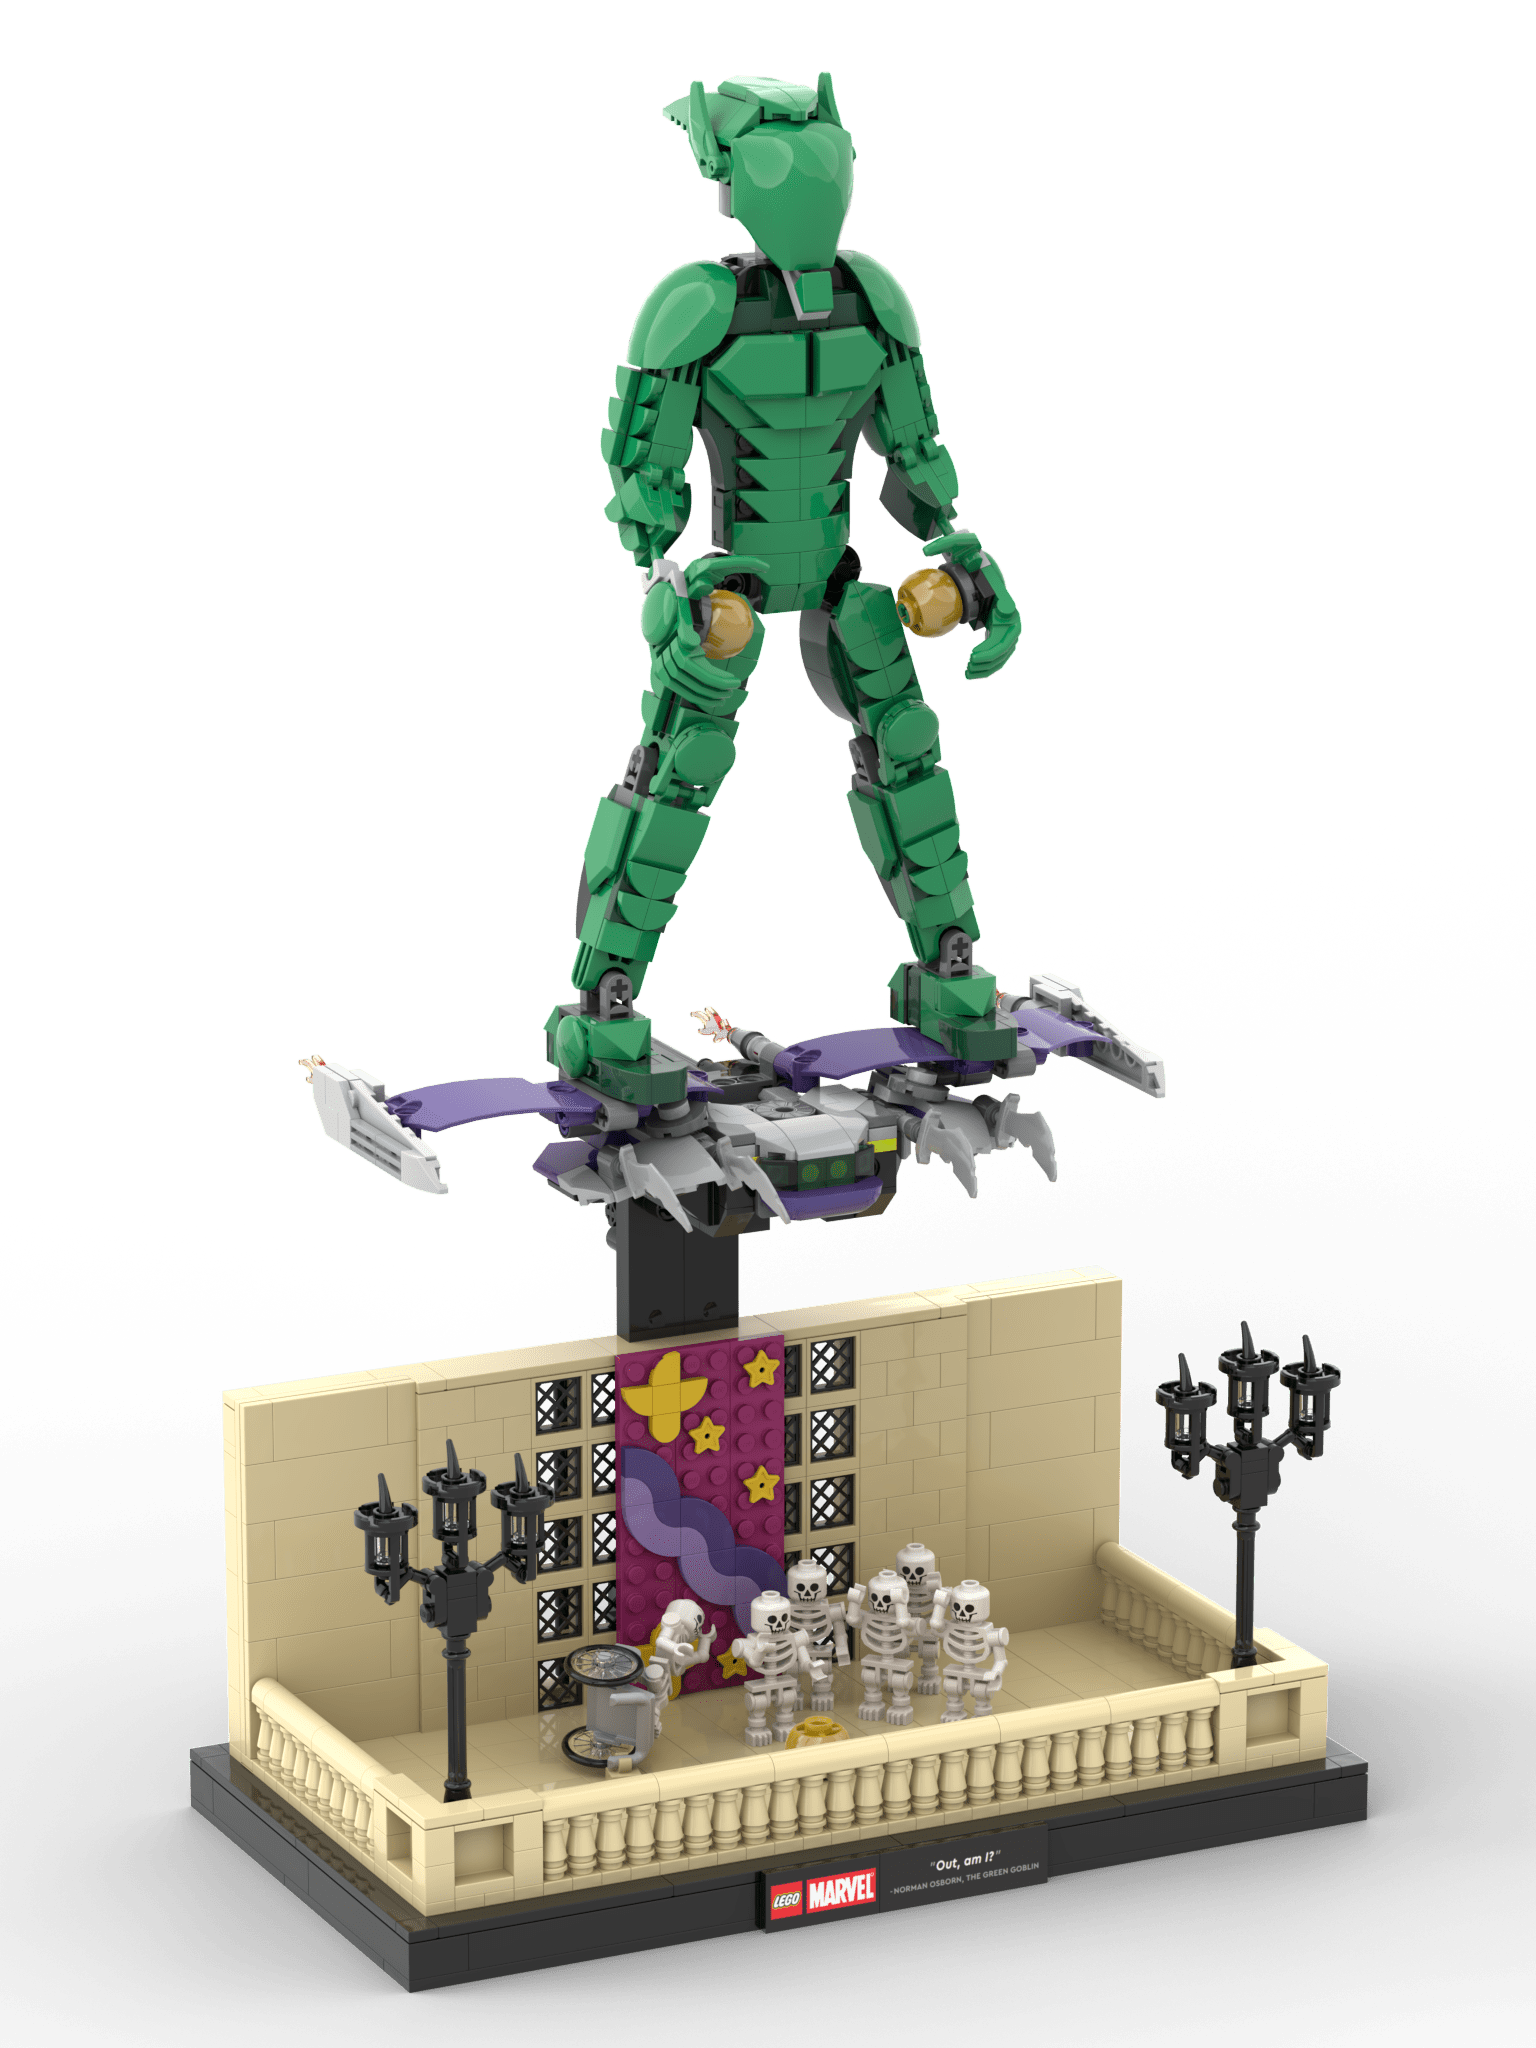
On 1st April 2024 LEGO released set 76284: Green Goblin Construction Figure, a buildable action figure of the character that is clearly based on the 2002 interpretation of the character in Sam Raimi’s Spider-Man. While no mention is made of the movie in the official marketing of the set, it inspired me to make something to accompany it.
I settled on a recreation of the famous “out, am I?” scene in which the Green Goblin uses a Pumpkin Bomb to skeletonise the Oscorp board of directors that ousted Norman Osborn. Funnily enough the Green Goblin Construction Figure actually comes with what looks like two Pumpkin Bombs in its hands, but these are referred to as “pumpkin blasters” on the official LEGO website.
On top of being a LEGO representation of this scene I also decided that my build would be a base for the set. LEGO included the famous Goblin Glider as a separate build in the set, so my LEGO scene would be placed under it to give a soft illusion of flight.
While I’ll get more into the specifics of how this product came together, let’s look at the fruits of my labour right now with the gallery below. I have also made a completely free parts list and set of instructions so anyone can replicate this at home. The parts lists and instructions can be found on Rebrickable for download or you can click here to view the PDF instructions right in your browser.


With the basic outline for his project in mind I jumped into Studio – the official LEGO CAD software that is free to download – and got to building. I had to make the first big decision of the project and decide on the main colour that would be the side of the building and balcony that the scene takes place on.
While one of LEGO’s browns or nougat colours would have likely been a closer match, I decided to go for tan instead. Tan looks close enough to the building in the scene and it’s a colour that LEGO uses very often. This made my choice of available parts wider and it should make gathering the pieces easier, not to mention cheaper.
While LEGO makes several railing pieces none of them matched the design in the movie. I had to build this from scratch with LEGO’s familiar 1X1 cone piece being the star of the show. This was sandwiched between some other 1X1 plates to make a railing I think is very close to the movie, at least at this scale.
The railing terminates in corners which have a boxier design that uses a reversed panel to make the relief. These hide a pair of triple-light lampposts which I also needed to recreate. Now I am no architect, but I am not entirely sure why a skyscraper’s balcony has lampposts, but these do add some visual flair to the scene. These proved to be on the harder side to make accurate but again, for this scale, I think it’s pretty good.
Shout out to the lamppost design in set 910002: Studgate Train Station which inspired my build.
With the railings done I could focus on the back wall which is actually complex and varied for being, you know, a wall. The wall has two distinct segments, a large window and a decorated banner hanging over said window.
I started from the outside and replicated the horizontal detailing with tiles. This is followed by some simple LEGO bricks stacked as normal. Why reinvent the wheel when LEGO bricks already look close to real world bricks?
The banner proved another headache to make in this scale. The banner in the movie features three large and chaotic stripes, a pair of birds and a smattering of stars. The stripes proved the most difficult part of the banner and I am still not entirely happy with the final result, but the tiles used to represent them get close enough.
I made some other stripe designs I think look better, but they depend on very rare curved tile pieces, so I went with a design that used more common ones. I am, however, proud of the birds which were made using just five simple tiles each. This is very simple but immediately recognisable.
Finally the stars are made with LEGO’s own star pieces which aren’t as flat as the tiles used in the rest of the banner, but it’s close enough.
The window behind the banner was done with LEGO’s own window diamond lattice pane. These are rather small so I used a bunch of them to give the illusion of a larger window. I also had to make a support behind this window to reinforce it, without being seen through the lattice. This support connects to other support structures behind the wall which makes it very strong despite only being two studs wide.
The Oscorp directors are represented by a handful of LEGO’s skeleton minifigures in a variety of poses. One of the directors was in a wheelchair so I also included a wheelchair in the LEGO scene. LEGO only started making this dedicated wheelchair piece a few years ago so it’s handy that we have it now. In the centre of the skeletons is another Pumpkin Bomb / pumpkin blaster from the large Green Goblin.
Now this is a bit of a clash of scales as the Green Goblin isn’t minifigure size, but it connects my build to LEGO’s so I decided to keep it as is. I could have probably built something that was more clearly an explosion but, again, I wanted the link between the two builds.
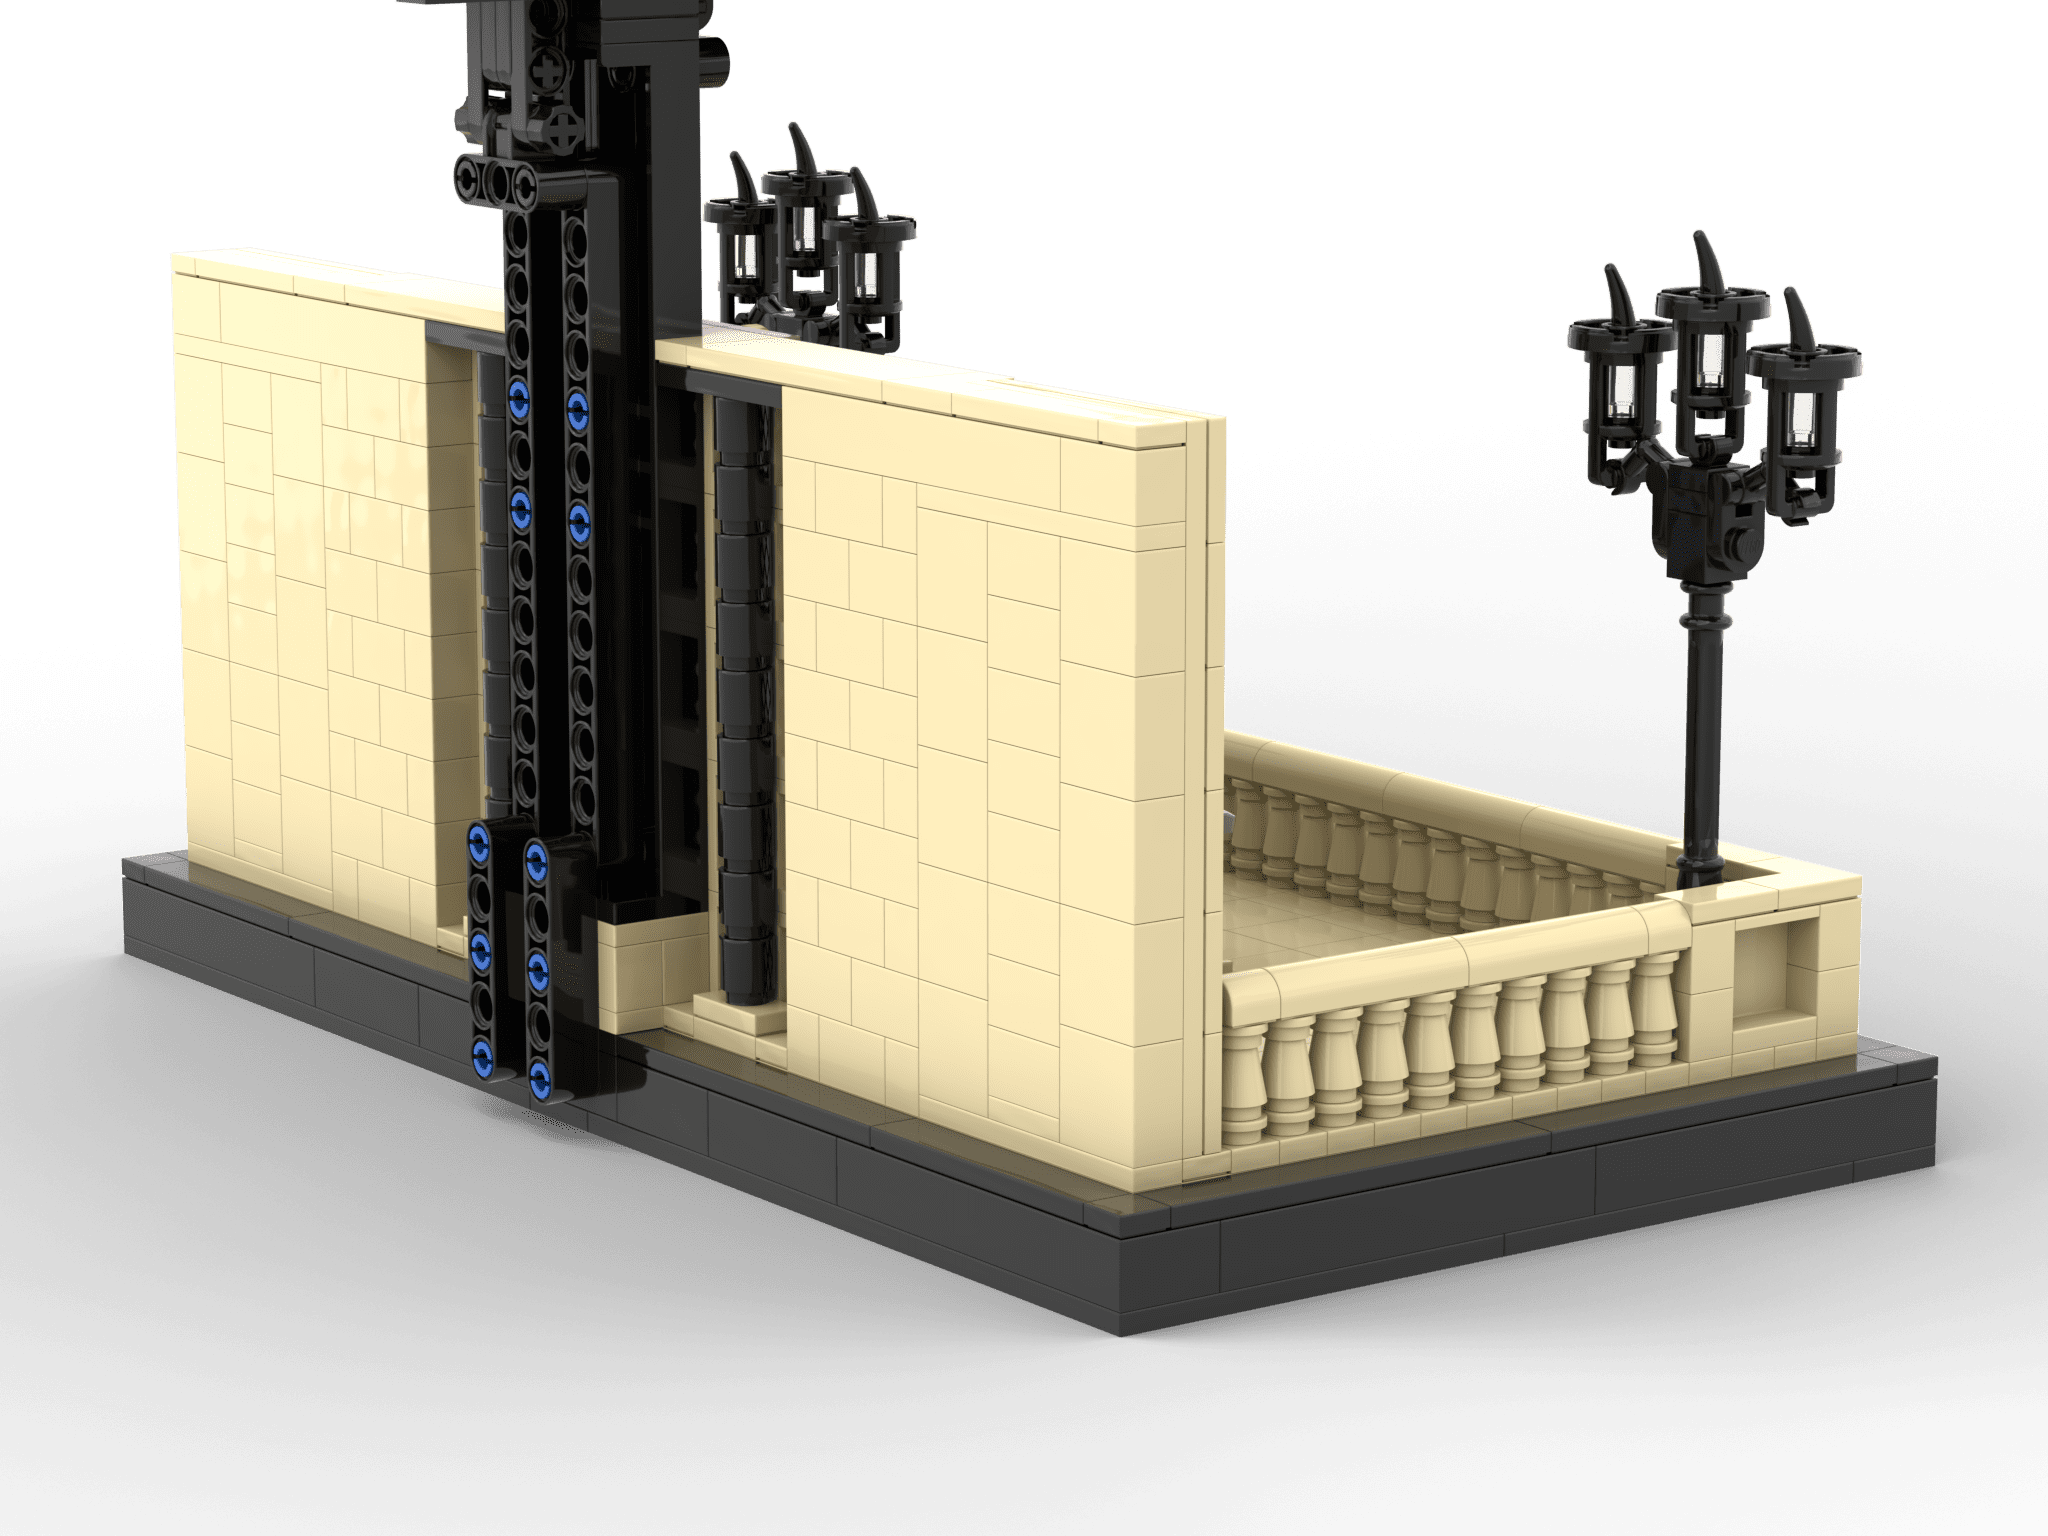
At this point I realised that the entire build would be a bit thin and not able to support the huge Green Goblin figure. I decided the build needed a larger base which I could use to hide some reinforcement for the stand.
Direct inspiration for this came from LEGO’s own subtheme of Star Wars Diorama Collection sets. Each of these sets features a distinctive black base with silver detailing as well as printed tiles with the LEGO logo, Star Wars logo and a unique tile with a quote from the scene that the set is replicated.
Not only would this formula of design give me a base for my building needs, but it would also be a great place to have “out, am I?” represented in the pieces themselves.
The Diorama Collection sets vary in size but I used 75330: Dagobah Jedi Training Diorama as an influence because, as far as I can see, it has the biggest footprint of all the sets in this subtheme. It is 34 X 17 studs, which (through pure happenstance) is exactly big enough to fit my 32 X 16 scene with a stud on each side to create a frame.
In preliminary building tests I was already using two of LEGO’s 16X16 square plates as the foundation of the entire build, so the world I had already put in could simply be transferred into this new black base.

Inside of this black base I hid a backbone of Technic pieces. For those less familiar with LEGO, Technic is a Theme focused on mechanical structures which have a lot of added strength to them. Technic can be incorporated into regular LEGO (referred to as System) to add mechanical functionality or added strength, and it’s this strength we were after.
This Technic backbone sticks out from the back of the black base, wraps around the back of the building fascia, and then protrudes again over the wall. This creates an angular C-shape that will not only bear the weight of Green Goblin, but also provides extra strength to the entire build.
I experimented a bit with transparent pieces for the section to hold Green Goblin, but the selection in LEGO’s library was limited, so I went for black. Black is often used in flight stands in all model hobbies, including LEGO, so it was good fit here.
Now for the connection between the back supports and Green Goblin, I must have redesigned it more than a hundred times. This part of the build needed to be strong enough to hold the glider and Green Goblin, small enough not to be an eyesore, rigid enough not to droop and there could be no modification done to the glider / Green Goblin to accomplish all of this.
My goal here was that the original LEGO set would be left unaltered. This not only makes my build more accessible, but it removes the annoyance of other builders who may already own the set and don’t want to take it apart to make alterations to fit my design.
This was a huge problem because the glider has very few connection points, especially when I need the entire weight of the Green Goblin to sit on top of everything.
I won’t bore you with all the failed designs but what I finally settled on was a pair of Technic brick “forks”. These stick out from the back support and provide six studs that connect to the bottom of the glider. That doesn’t sound like much but four of the studs are deep within the glider’s base, providing a lot of support. A lot of shake tests, and monitoring of potential droop, was done here, and this added at least a few weeks to this project on its own.
During these tests with real bricks I also decided to ditch the silver accents which were a holdover from the Star Wars diorama inspiration. The cleaner black base fits better here, I think, and LEGO has done it too like in this Jurassic Park set.
Finally I needed some custom stickers made. While I loathe stickers in official LEGO sets, this is the only easy way to add what I need to the front of the build. The Star Wars dioramas all have the luxury of including printed tiles with the LEGO logo, Star Wars logo and a character quote from the scene that the diorama is depicting.
The quote for this scene is, of course, “out, am I?” and then we also need a seperate sticker for the LEGO and Marvel logos.
Here I say a big thank you to Vizcom, a local graphic designer and part of the LEGO community. He created the two stickers for the front of this build and it really ties everything together. In the files on Rebrickable there is a PDF with the instructions and a second PDF with the stickers at their full size. Simply print this out on your choice of paper or sticker label and affix it to the two black tiles in the centre of the base.

