

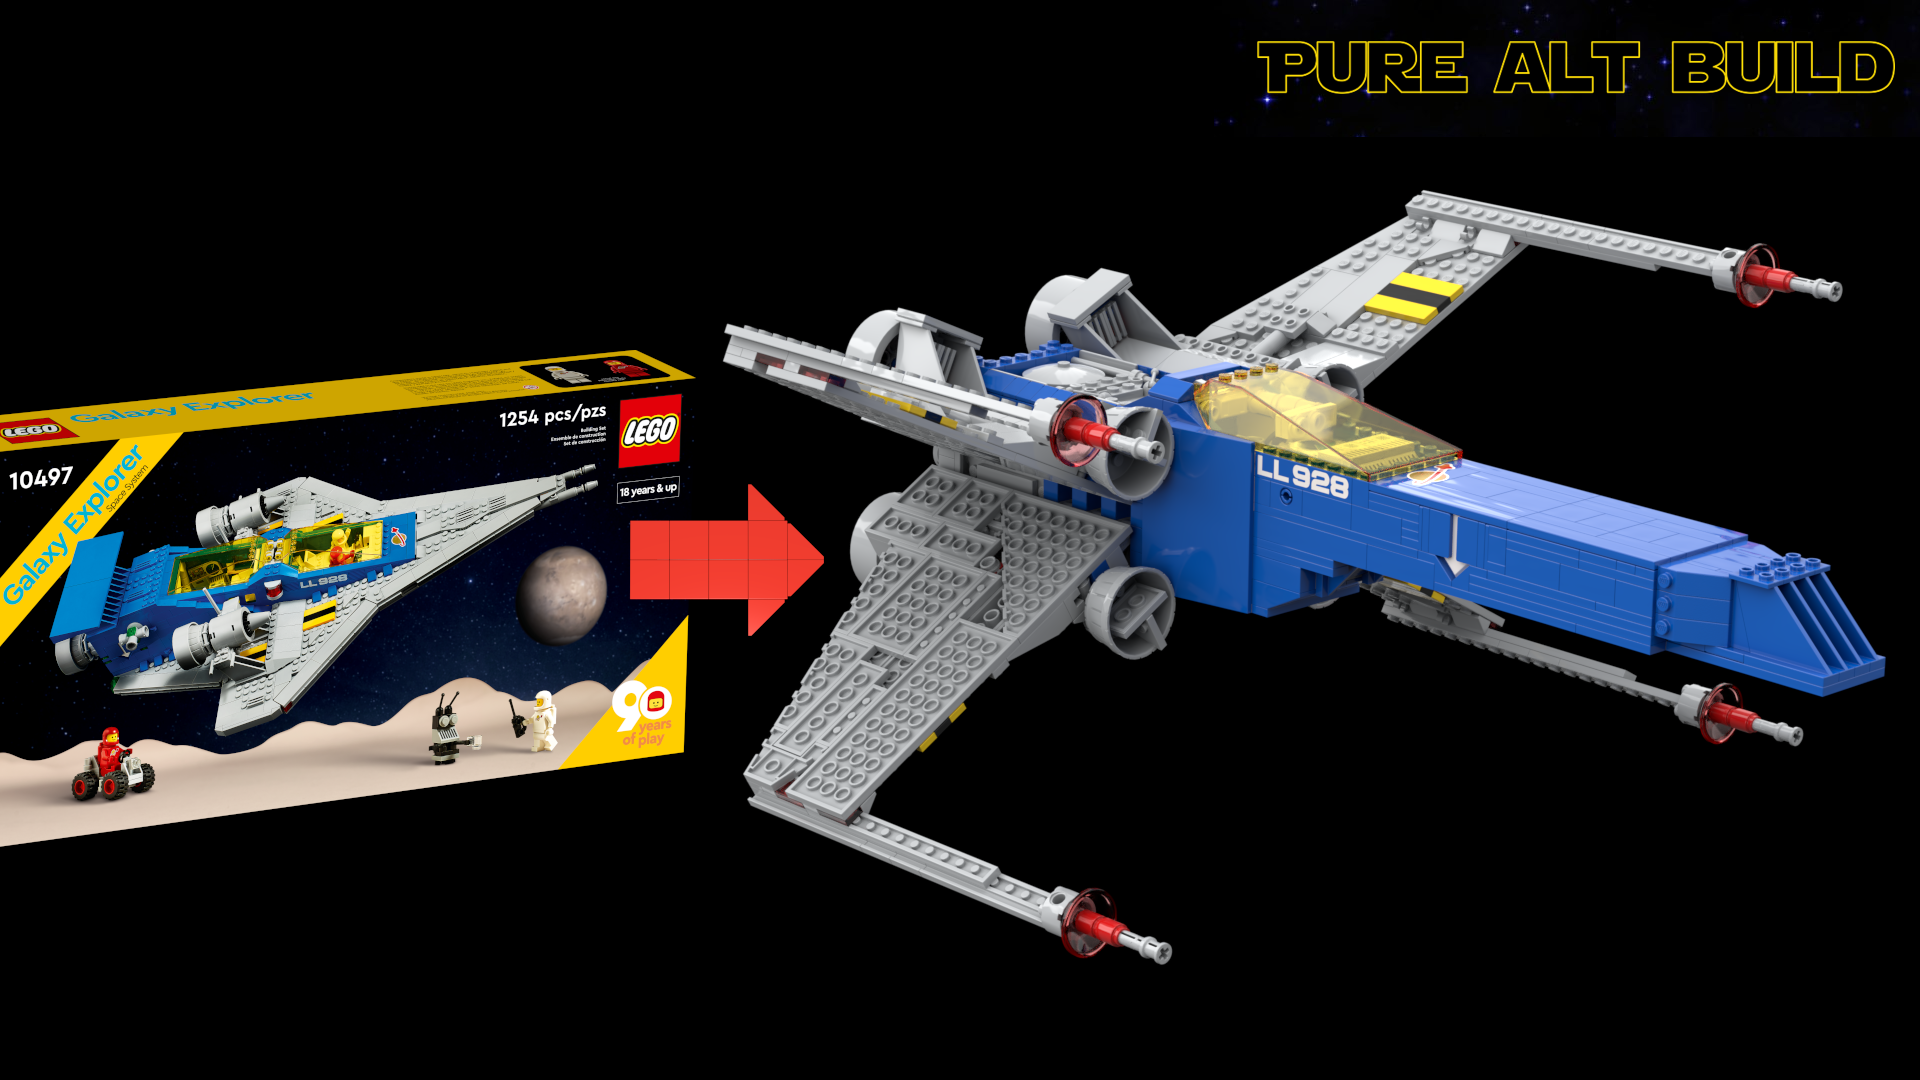
Launched in August 2022 and retired in December 2023, set 10497: Galaxy Explorer is a love letter to Classic Space, LEGO’s in-house theme from the late 70s that created a generation of sci-fi fans.
In that way Classic Space shares much in common with Star Wars, so why don’t we smash them together?
Over the last two or so months I have been making a large scale Star Wars X-wing using only the pieces from 10497: Galaxy Explorer, a project that is thankfully now done that you can replicate yourself at home.
All you need is one copy of the Galaxy Explorer and my free PDF instructions you can find at the bottom of this article, or on Rebrickable.
That’s it. You don’t need multiple copies of the Galaxy Explorer and you don’t have to pay a cent for the instructions. Given that many people actually bought several copies of the Galaxy Explorer to build the other two official alt builds, I know that there are many Classic Space fans sitting on a stockpile of this set.
Even if you’re not a die hard fan of Classic Space, the Galaxy Explorer should be relatively easy to come by even though it is retired. While LEGO itself will usually cease sale as soon as the retirement date happens, most other retailers will continue selling it until stock runs out.
Hopefully you will want to use at least one Galaxy Explorer because I worked hard to make this project as good as it can be using the available pieces. On that front this X-wing sports the, well, classic Classic Space colours. Taking inspiration from the colour blocking of the Galaxy Explorer, I wanted the S-foils to be entirely grey and the fuselage to be entirely blue. This was extremely difficult to pull off because I also wanted the S-foils to be as thin as possible (just one plate thick at many parts) but also for the space between the closed foils to be as close as possible. Even LEGO’s own X-wings have large gaps between the foils, so I wanted to outdo them a bit on that front.

Single-plate construction is difficult at the best of times and even harder here with limited pieces. Similarly difficult was the movement of the S-foils to switch between normal flight mode and the eponymous X attack formation. LEGO’s aforementioned many official X-wings over the years have used a combination of regular gears, worm gears, elastic bands, complex Technic mechanisms and even shock absorbers. The Galaxy Explorer donor set had none of these so I had to improve using a borderline illegal connection between Technic holes and studs on modified bricks.
The limited piece count and desire to make thin wings that move lead to the wings and their joints taking up most of the time in the project, but I’m very happy with the result and how the colour scheme I envisioned is mostly adhered to.
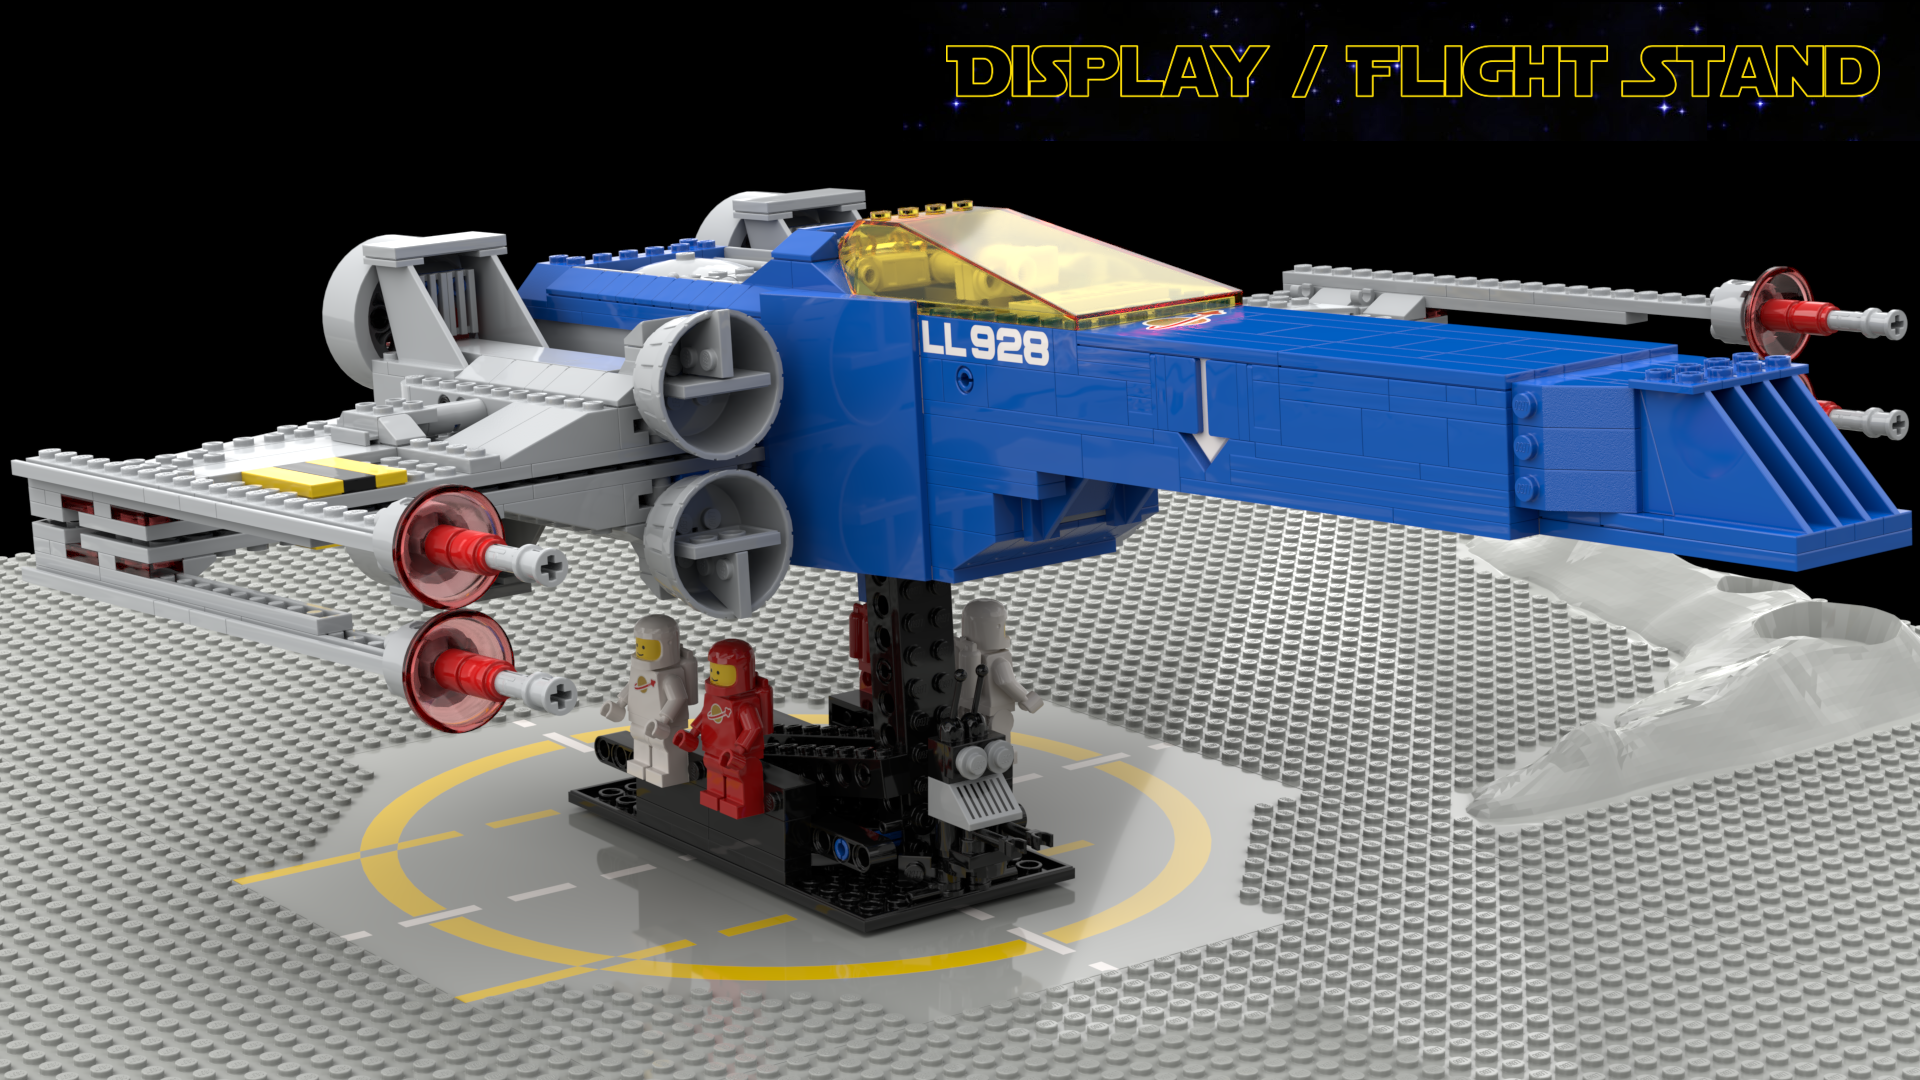
On the topic of colour I also limited myself to keeping almost all of the scarce black pieces aside in this build. Why? Because LEGO uses plain back to make flight / display bases for many of their impressive display pieces, and I wanted to do the same.
Again using only the pieces from the Galaxy Explorer, you get one of these stands from the pieces available. The connection point is even based on LEGO’s own Ultimate Collector Series (UCS) stands so there is some interoperability between them, but I don’t recommend switching them around.
The stand even has place for all four of the minifigures included in the set.
The entire Classic Space X-wing is built around a central “backbone” with the stand connection point in the middle as strength was an overall focus for the project. I could have easily made something that looked a bit better but fell apart, but this would have been an awful experience for anyone making their own. I am very happy with the strength of the finished model and how well it sits on the stand. I won’t say that it’s as strong as an official LEGO model, but I think it’s very close.
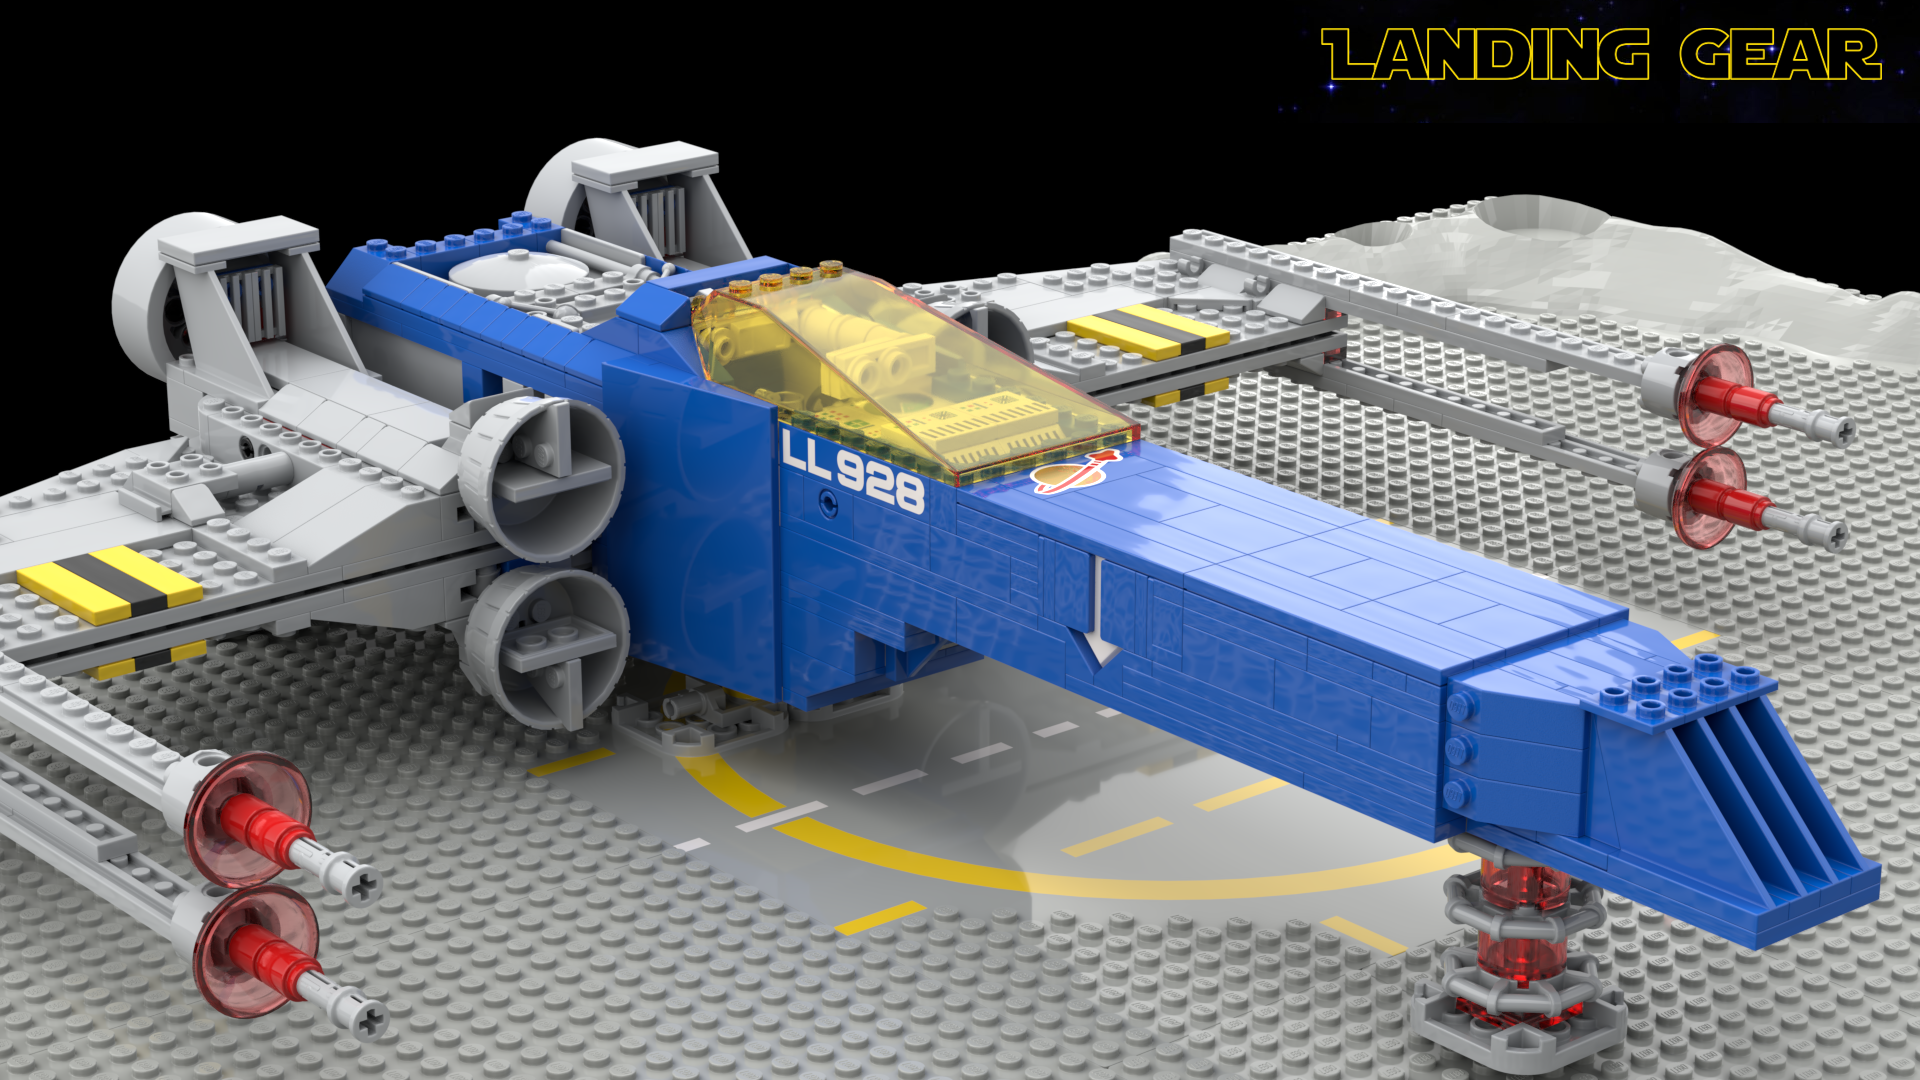
One function I really wanted for my build was retractable landing gear that the Galaxy Explorer actually has but LEGO’s own X-wings haven’t been able to incorporate yet. Unfortunately I couldn’t pull this off either, as the main body of the X-wing was too small to be structurally sound and have moving parts inside of it.
I did, however, compromise and come back to this idea right at the end of the project. Using the very few remaining pieces (my alt build uses around 87 percent plus of the available pieces) I made two small landing gear – one for the front and one for the back. The front one attached with studs but the back one uses the stand connection, which is studless. You will build these stands in the main instructions of the project as they will give you added support when building out the X-wing. They can later be removed and even stored in the display / flight stand.
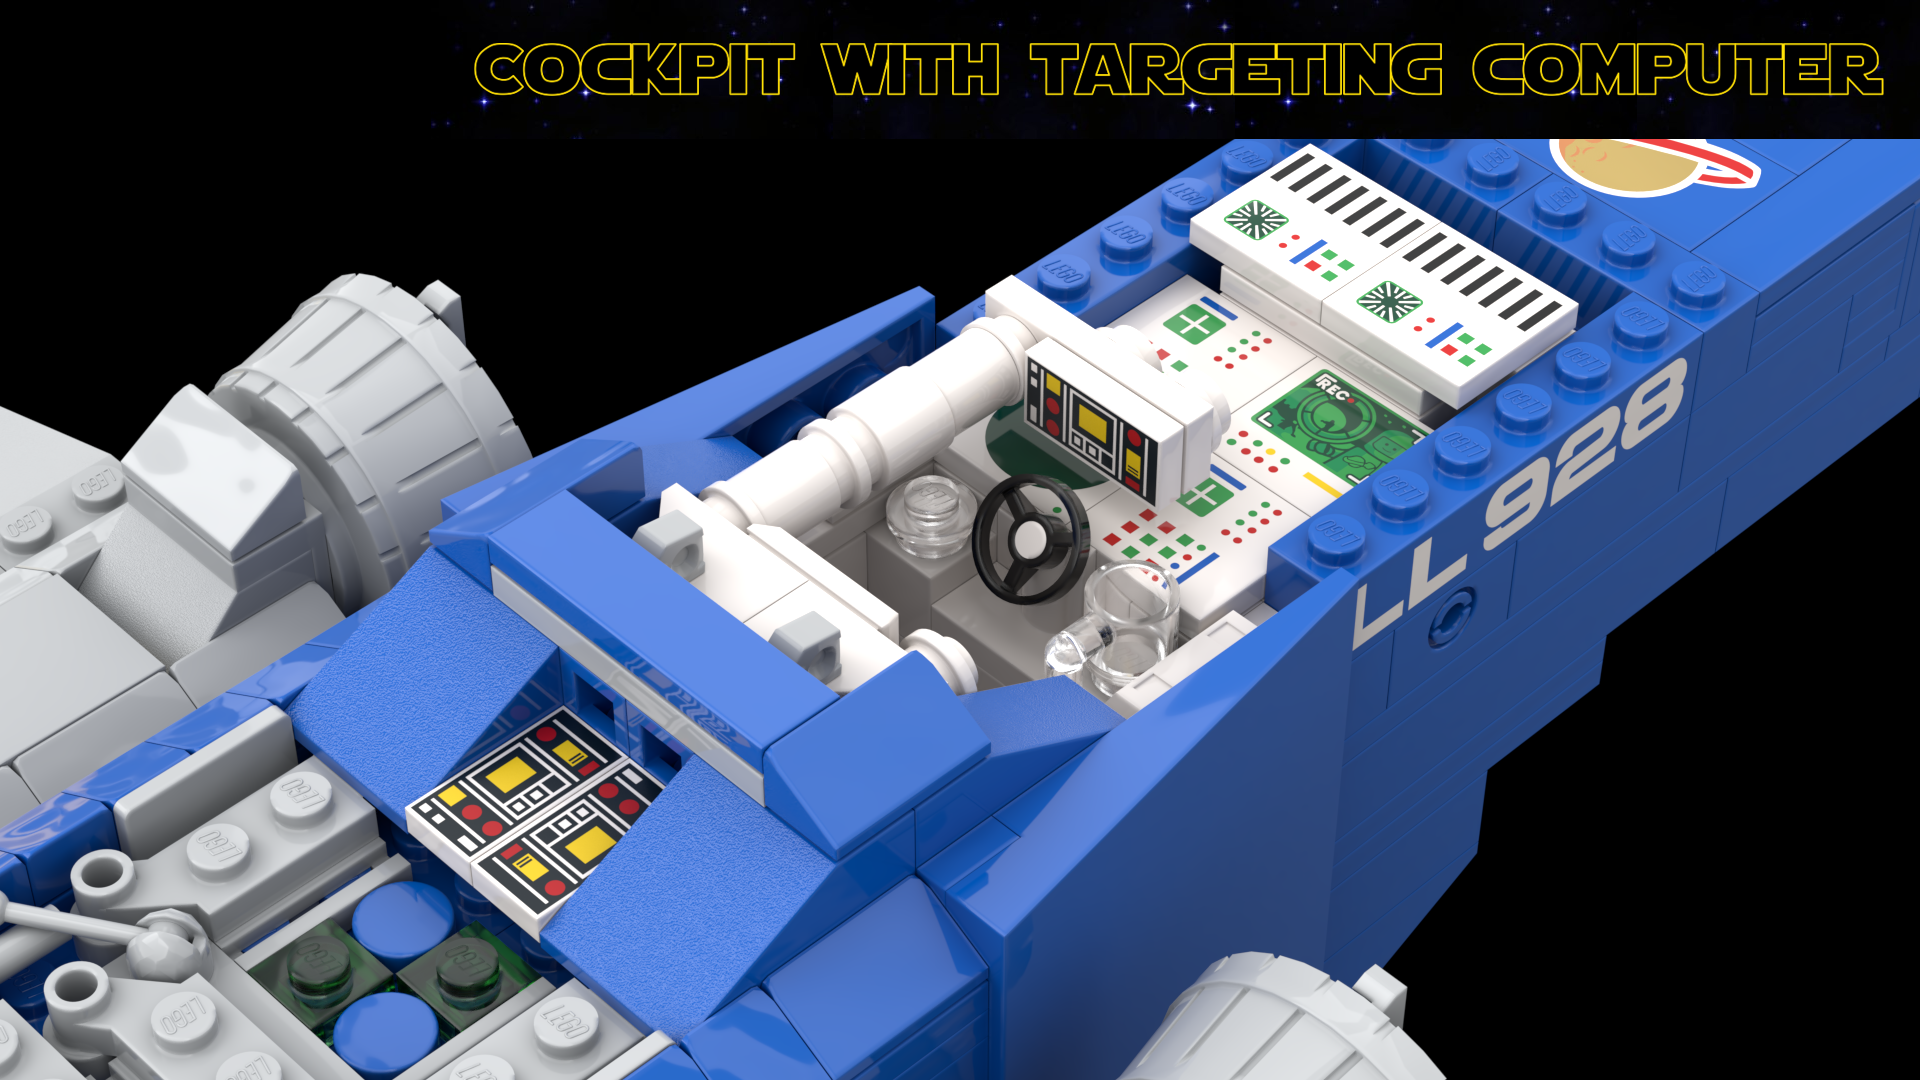
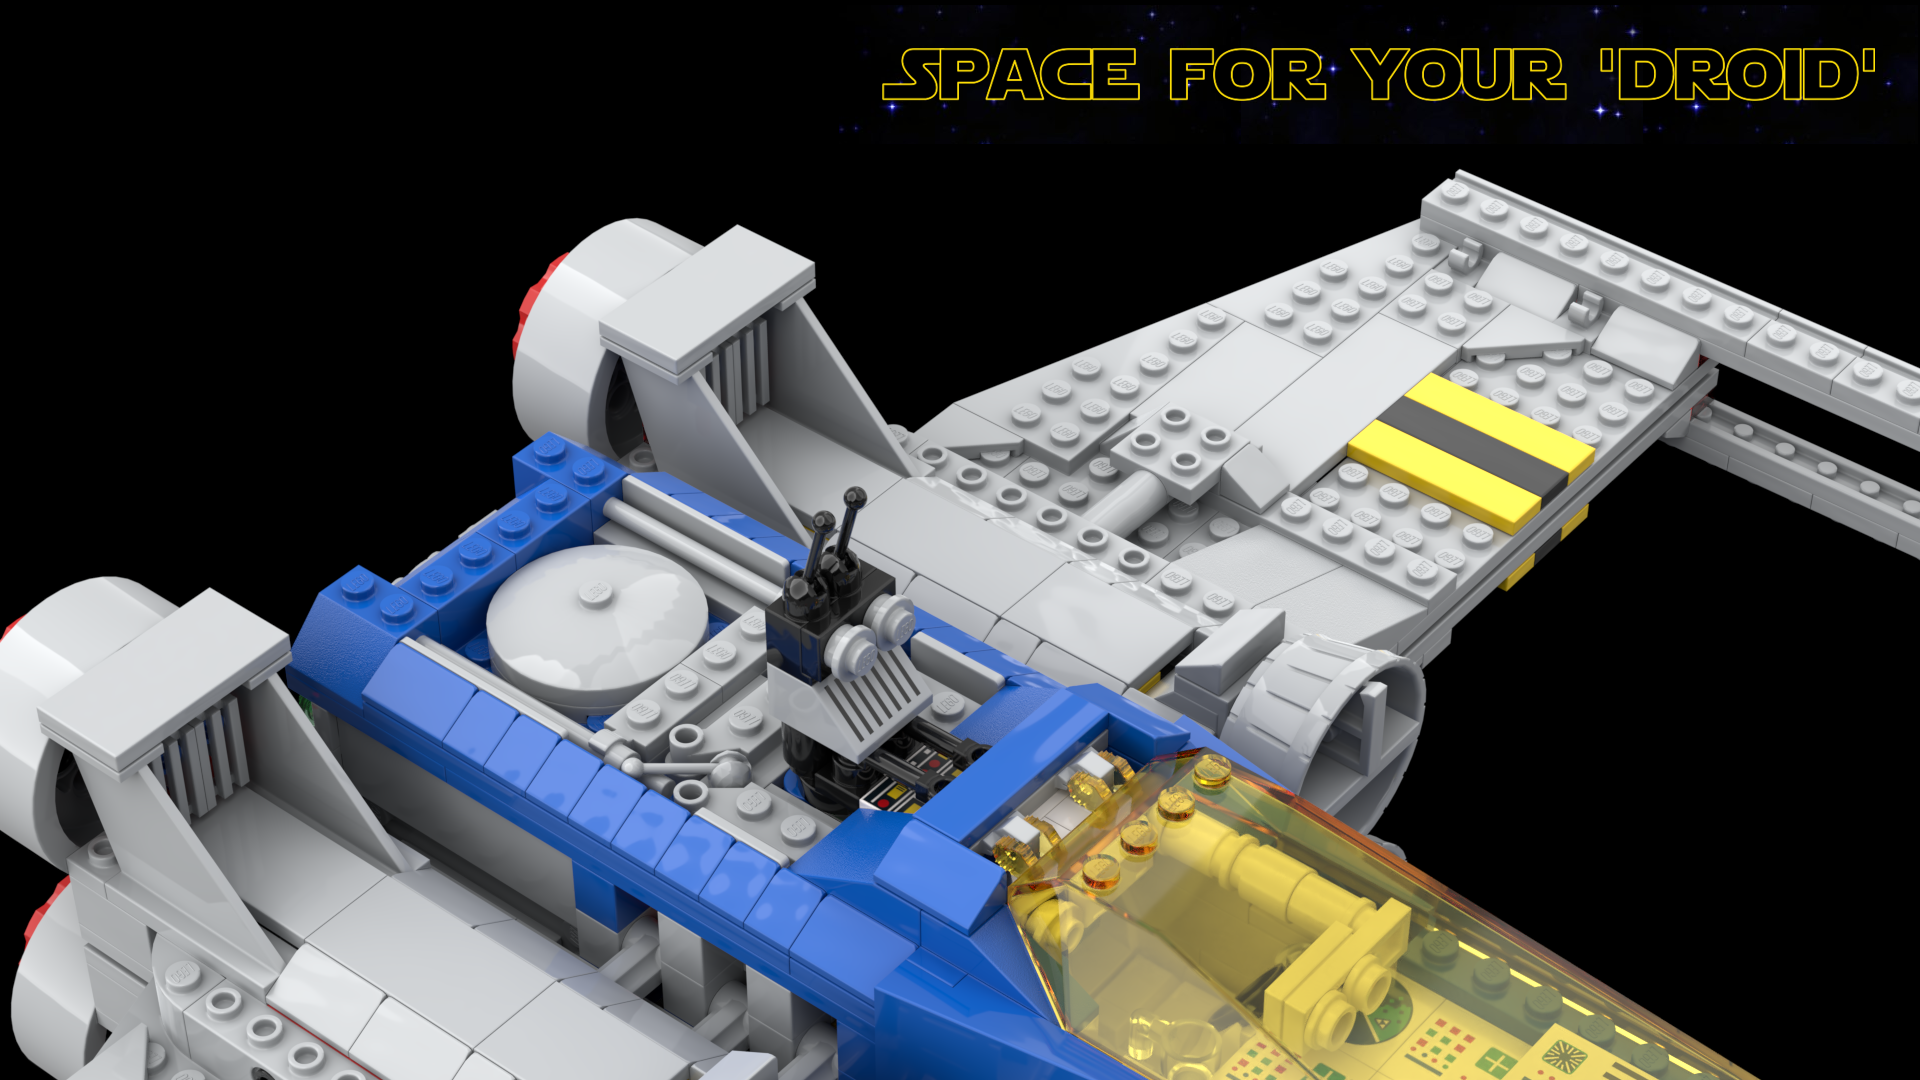
Going back to colour limitations and the cockpit uses mostly white pieces, just like the Galaxy Explorer and many other original Classic Space sets. The cockpit makes use of the generous amount of printed instrument pieces in the original set and there’s even a facsimile of the targeting computer that stretches out from the cockpit headrest to be in line with the pilot’s eyesight. Just make sure you fold the targeting computer back down before closing the canopy, or the two will collide.
Another fun inclusion I wanted right from the start was leaving the small robot from the original set intact. Classic Space, like Star Wars, has small to human sized droids running around to help the human and alien characters. The Galaxy Explorer’s droid is simply referred to as “the little robot” in the instruction book and this little robot can be kept unchanged from the original build. This robot can then be slot into a space right behind the cockpit, just like R2 droids go into X-wings. Don’t like the robot being there? It’s only connected with a pair of studs for easy removal. The robot can also be displayed on the base of the flight stand along with the minifigures.
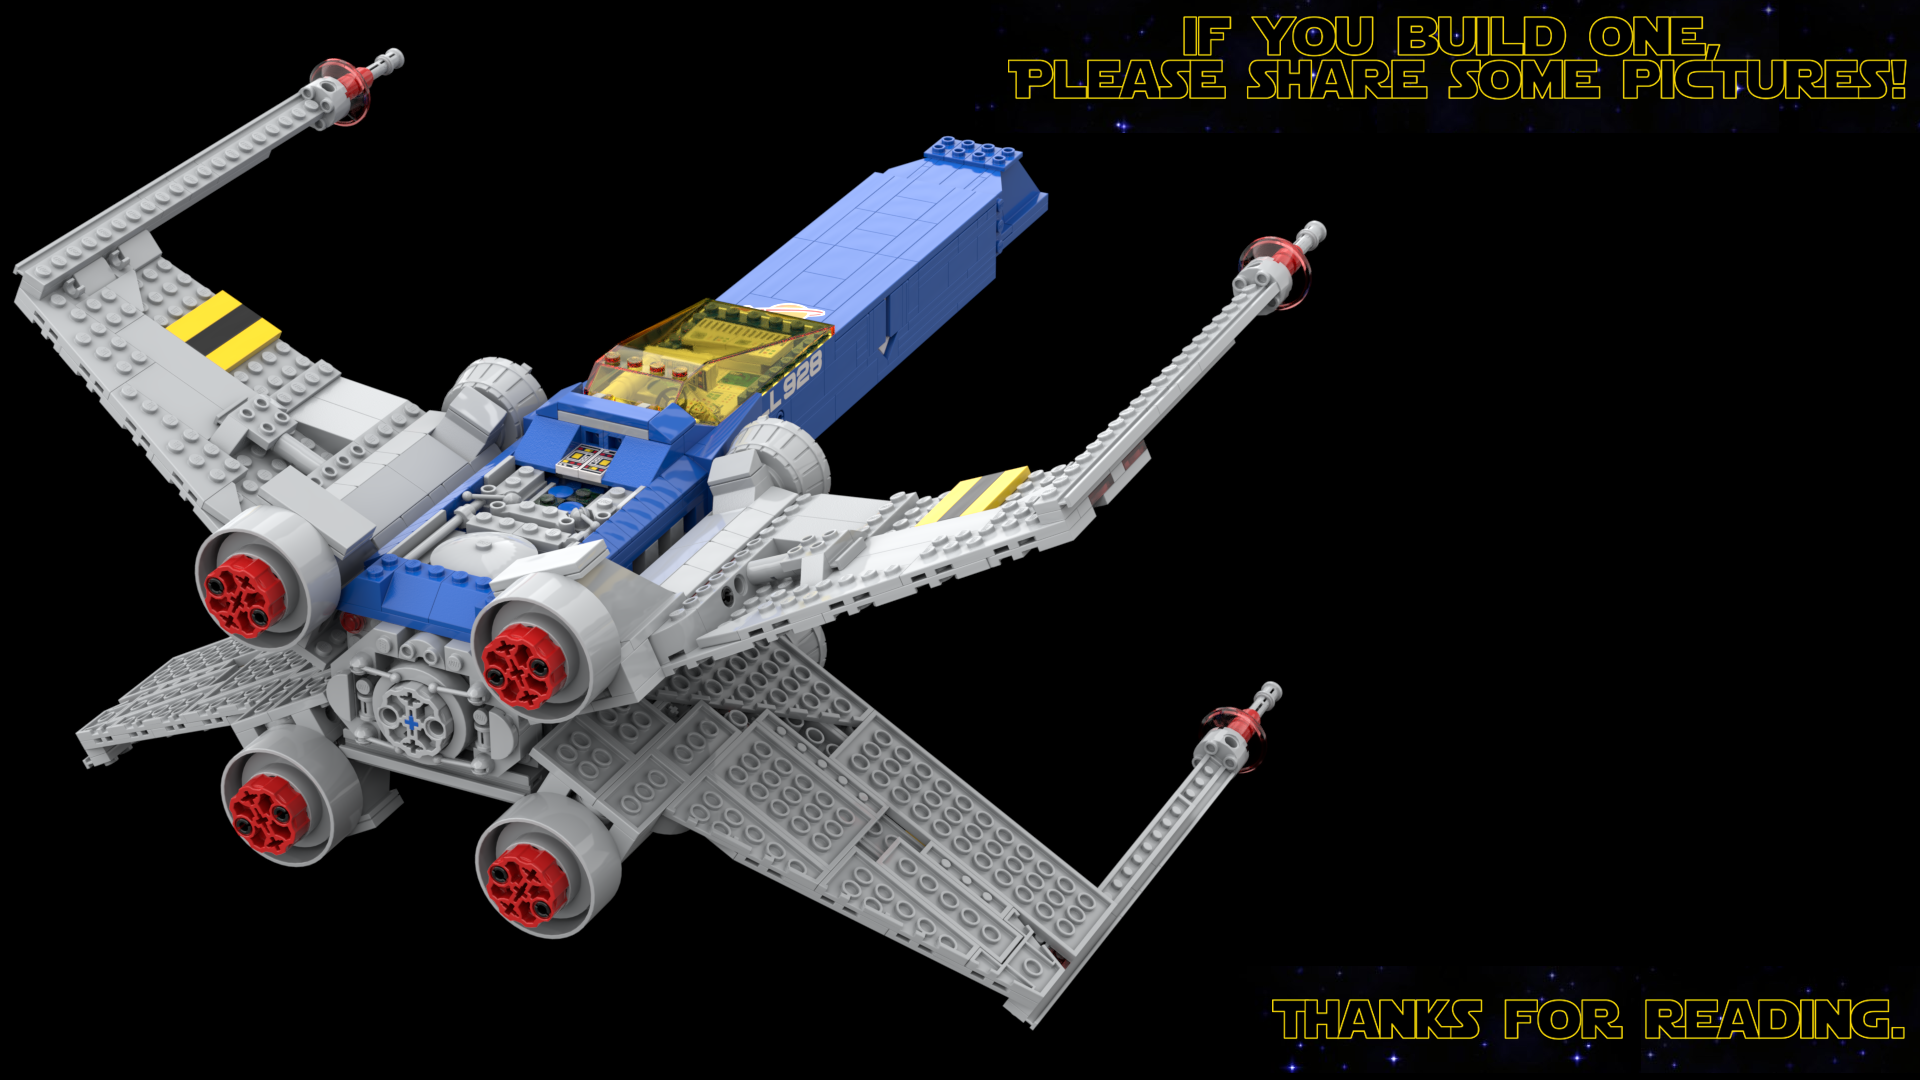
There’s a few other features, cool building techniques and surprises in this Classic Space X-wing, but I’ll leave the rest for you to find. Again the instructions can be found as an embed below or on Rebrickable. If you make your own I’d really appreciate any pictures to be uploaded onto the “Photos” section of the Rebrickable page.
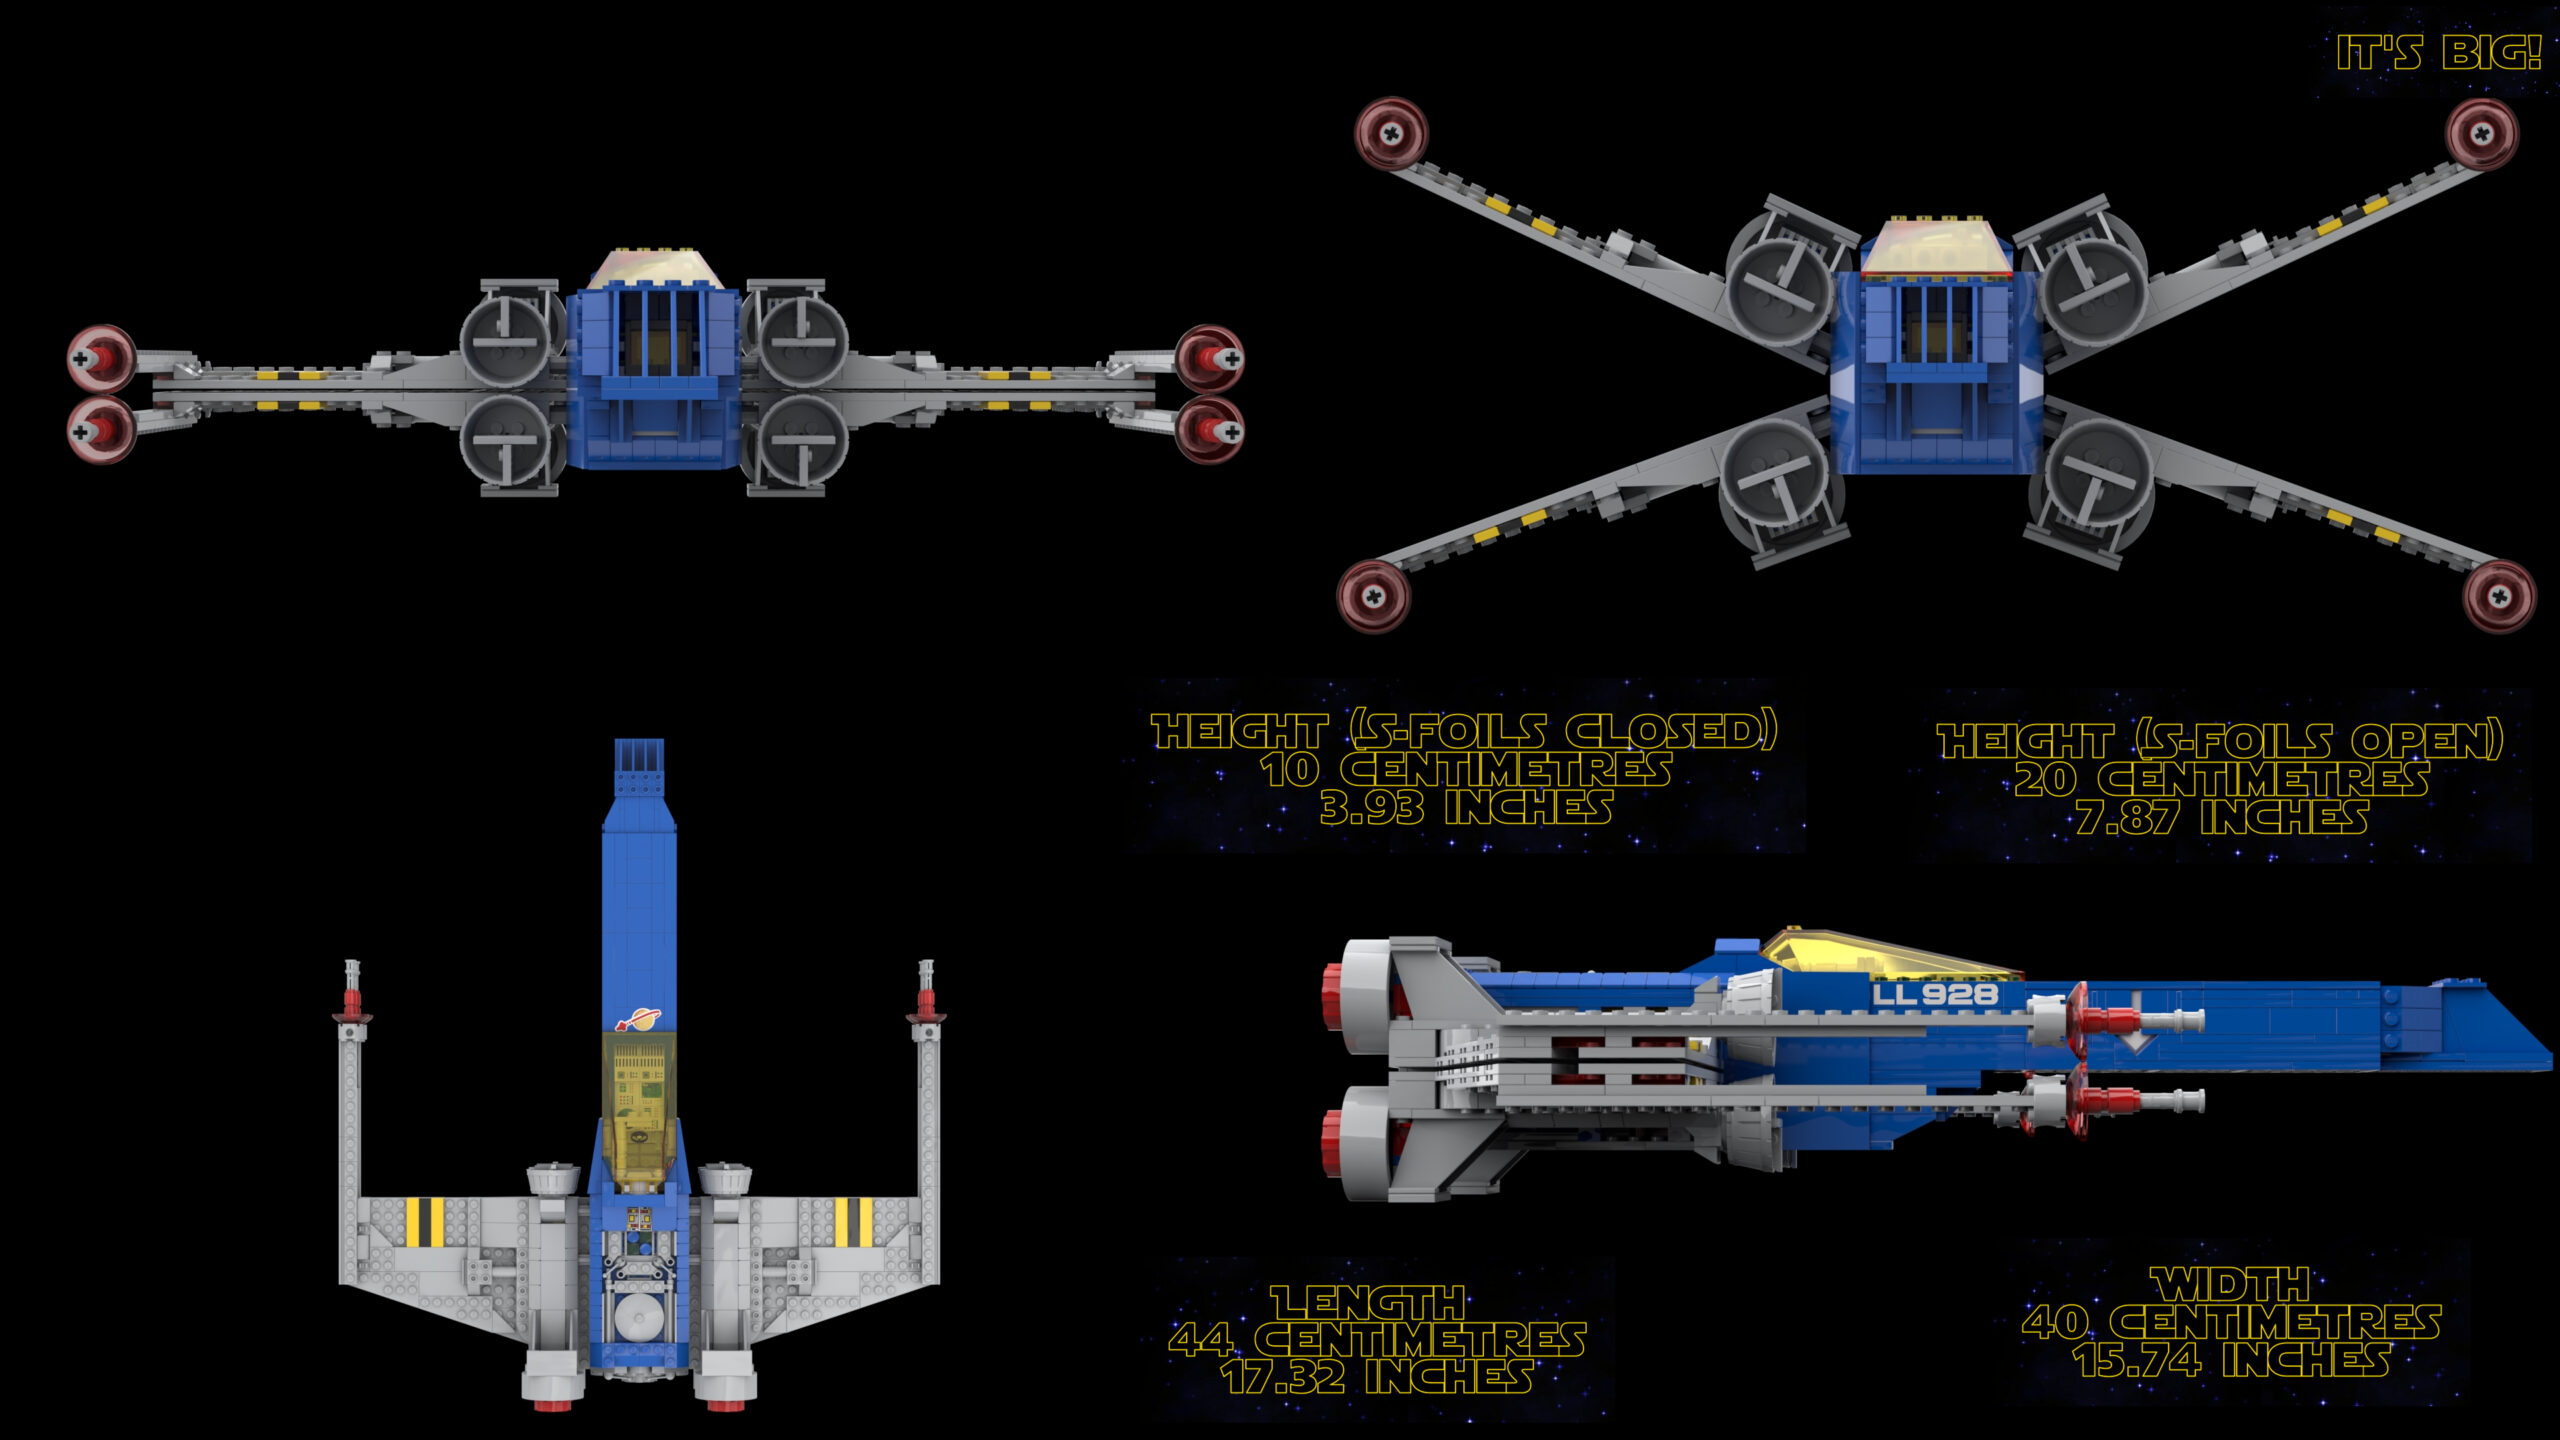
Before I leave here are the dimensions of the build to give you a better sense of its size and / or to carve out some precious real estate on the shelf. The rough measurements below are length (nose to tail) X width (wing tip to wing tip) X height without the little robot sitting in the back, and not counting the landing gear. As you can see opening the S-foils doubles the overall height of the ship.
- S-foils closed: 44 X 40 X 10 centimetres | 17.32X 15.74 X 3.93 inches
- S-foils open: 44 X 40 X 20 centimetres | 17.32 X 15.74 X 7.87 inches
The display stand is around 10 centimetres tall but some of that height stretches into the X-wing. The stand is also angled back, not only for a more dynamic look, but also for the sake of stability.
Main X-wing and landing gear instructions
Display / flight stand instruction
Maintenance of your Classic Space X-wing
For anyone who has read this far I am going to assume you have built the X-wing. Below are some quick titbits for it.
- The display / flight stand is built on an upside-down tile. This tile’s surface is really prone to scratching. I recommend picking up the stand and the X-wing when moving the model, instead of simply sliding it around. I cut a small piece of tissue for under the tile and it works great at preventing more scratches.
- The targeting computer can be flipped up and down, like a proper X-wing, but the canopy cannot be closed if it is flipped up.
- Speaking of the canopy: it should close perfectly onto the open studs around the cockpit. If it doesn’t make sure all of those studs are straight and where they should be. They should also catch and keep the cockpit nice and closed. Try shutting the canopy a bit faster if it is still giving you issues.
- The wings and their joints are really temperamental. If you’re having trouble with friction or the S-foils locking into either mode. If this happens try removing the wings and making sure that all the joints are where they should be. Don’t be afraid to exert some pressure on the subassemblies to force them tighter around the joints.
- Still having problems? Try this.
- Close both foils.
- Grab two foils in each hand. Your palms should be around the yellow-black-yellow livery on the front edges.
- Push the foils towards the middle of the ship.
- Also close your hands so that the wings are forced towards each other.
- Ultimately the wing design isn’t perfect and may not do what you want it to all the time. Between the design only using the Galaxy Explorer pieces, the tolerance differences between pieces, it’s far from perfect. Once you’re finished playing around with it, and you want to move it somewhere for display, spend some time making sure the wings are as solid as they can be and then leave it like that.

